What Is Cloudflare For WordPress?
Cloudflare is a free content delivery network and security tool. It speeds up the WordPress website and adds a security layer. The whole setup of Cloudflare for WordPress is considered the best CDN service in the digital market. The reason is the powerful features for small business websites.
This CDN tool is a system that consists of the distributed servers of the world. Due to this, the files of the website load faster in different geographical locations. That’s why the process of setting up Cloudflare for WordPress became crucial.
How Does The Setup Cloudflare For WordPress Process Benefit?
Most people don’t know the benefits of Cloudflare for WordPress websites. The whole process of setting up Cloudflare for WordPress confuses them. Here are the benefits this CDN gives to the website:
Excellent CDN
Cloudflare is one of the best CDN available for WordPress. It offers an excellent content delivery network all over the world. After setting up Cloudflare for WordPress, it offers a free CDN service.
Increase Website Performance
Cloudflare increases the overall website performance. The successful set of Cloudflare for WordPress results in fast website loading speed. It also gives other performance benefits like enabling compression and managing the codes.
Next Level Security
It offers the next level of security in the form of SSL certificates. Once you set up Cloudflare for WordPress, you can enjoy the custom security features. For these features, you need to access your WordPress dashboard.
How To Set Up A Cloudflare For WordPress?
After you know the top-notch facility of Cloudflare, the next step is to connect it with your website. For a WordPress website, the whole setup process consists of steps. You need to follow each step to set up Cloudflare for WordPress:
Create A Free Cloudflare Account
The first step in setting up Cloudflare for the WordPress process is to create your free Cloudflare account.
- Go to the official website of Cloudflare and click the Sign-Up button.
- In the next step, enter the Domain name of your WordPress site. The domain name of your website that you want to connect with Cloudflare. Now, click on the Add site button.
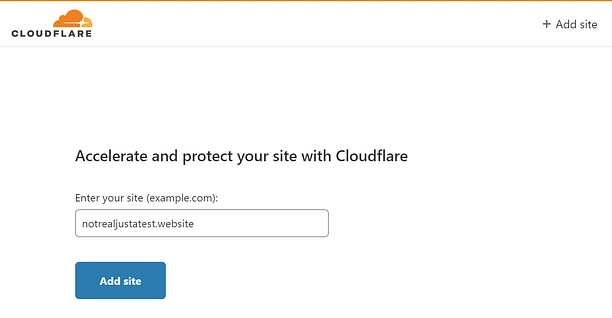
- After completing the above step, you will be asked to choose a plan. There will be different Cloudflare plans available on the screen. This plan consists of Free, Pro, business, and Enterprise.
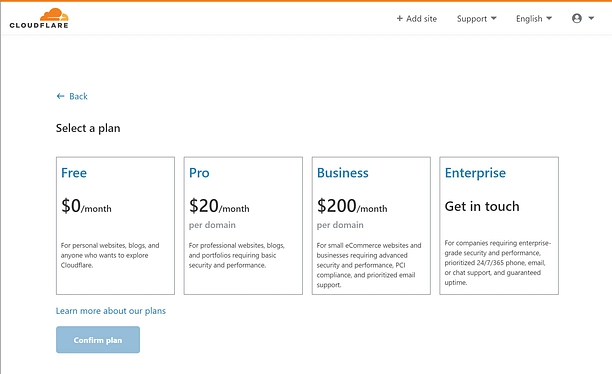
- For now, select the Free plan; it offers the basic features any WordPress site needs.
Verify Your DNS Records
After choosing a Cloudflare plan, the next step is to verify DNS records. It is the major step of how to set up Cloudflare DNS process.
- You will see the screen of Review your DNS records with various fields. Check the DNS records of your domain on the screen.
- You need to check the Orange color cloud icon next to your website domain name.
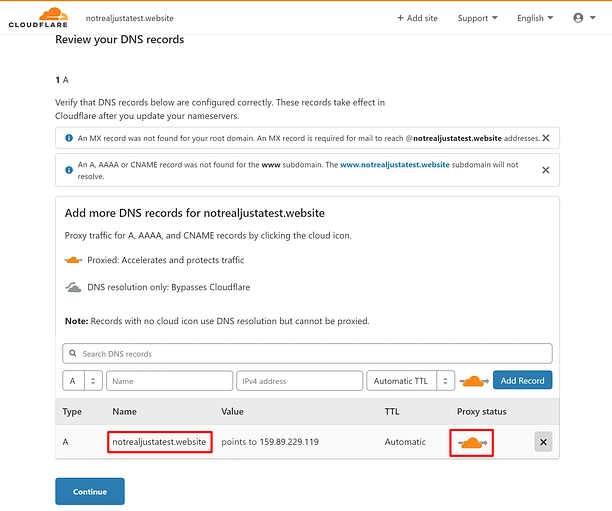
- Now, click on the Continue button at the screen’s bottom.
Update Nameservers To Cloudflare
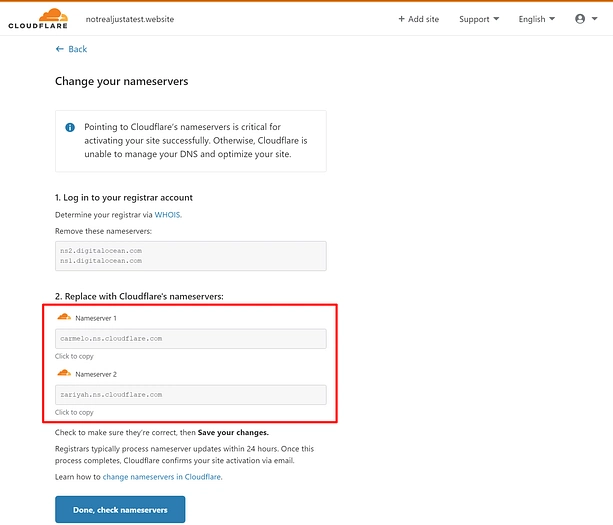
You can’t set up Cloudflare for WordPress successfully without updating your nameservers. Cloudflare will give you a set of new nameservers. You need to replace your current nameservers with the new ones. Nameservers are part of connecting hosting to your domain name. Cloudflare needs these nameservers to provide security and deliver content to the global server.
- Login to your current hosting cPanel dashboard. Now, go to the Domains section and click your Domain name.
- In the next step, navigate the Name servers tab and click the Edit button.
- Select the Custom option and enter the nameserver provided by Cloudflare.
- Click on the Save button. Now go back to the Cloudflare setup page and click on Done; check nameservers to finish the process.
Configure The Basic Cloudflare Settings
In this step, you will configure the basic settings of Cloudflare. Configuring the basic settings is an important step in setting up Cloudflare for the WordPress process.
- Select the Full option from the list to use the SSL encryption mode on your WordPress site.
- You will have other options in the settings like Auto Minify and Brotli. The Minify shrinks the size of your website’s code.
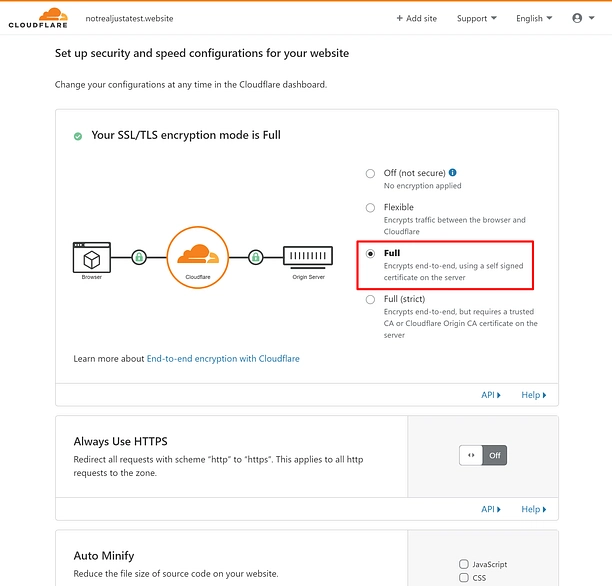
- After configuring all the settings of the Cloudflare, click on the Done button.
Verify The Setup Process
In this step, you need to verify the process of setting up Cloudflare for WordPress. After clicking on the Done, you might show a message to complete your nameserver setup.
- The update process of the nameserver can take up to 24 hours. You don’t need to worry if you see the message.
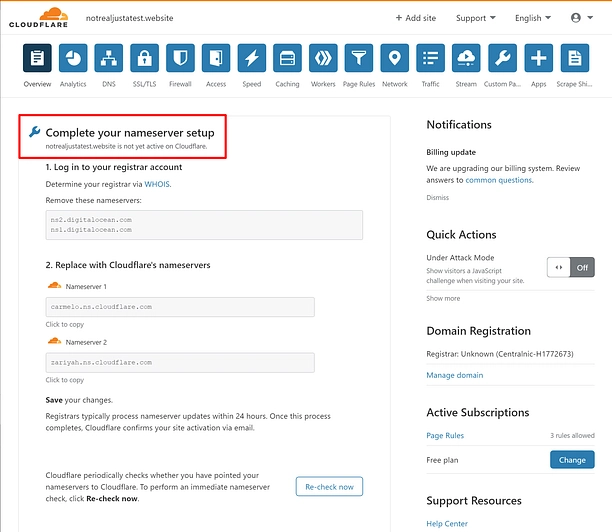
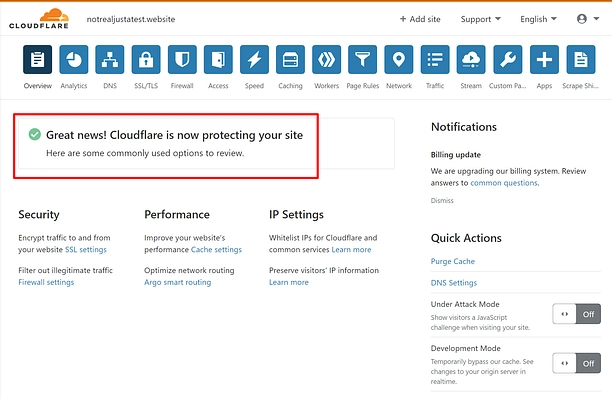
- After the update, you will receive the success message on your Cloudflare home screen. Congratulations, you have successfully set up Cloudflare for the WordPress site.
Read Also: How To Connect Your Domain In GoDaddy cPanel Hosting Easily?
How To Set Up Cloudflare DNS On Windows And Mac?
If you are a window user, then the whole process of setting up Cloudflare DNS is easy. As most beginners ask, how to set up Cloudflare DNS on Windows and Mac? Here is the answer to your question.
Set Up Cloudflare DNS On Windows
The Cloudflare DNS IP address is 1.1.1.1, which is easy to remember during the setup process.
- Open the Windows network settings.
- Now, click on the Change adapter options. You will see the list of network options on your screen. Select the Properties option.
- In the next step, checkmark the IPv4 option and click the Properties button.
- Now, click on the Use the following DNS server addresses radio button.
- Enter the Cloudflare DNS IP address in the preferred field.
- Click on the OK button.
Set Up Cloudflare DNS On Mac
The process of setting up Cloudflare DNS on a Mac is simple.
- First of all, open the System preferences.
- Now, search for the DNS servers and click on the servers in the result list.
- Click on the + sign to add a new DNS record. Enter the Cloudflare IP address, which is 1.1.1.1
- Click on other + Sign and enter the other DNS record, which is 1.0.0.1
- Select the OK and click on the Apply button.
Wrap Up
The above step-by-step guide shows the simple process of setting up Cloudflare for WordPress. A Cloudflare CDN boosts the website performance and brings a global audience to your site. It provides extensive benefits to the business website. We hope you learn something new from this post. Using this guide, you can set up Cloudflare on your WordPress or hire our experts.
Zone Websites offers a complete professional WordPress setup. Our professional team assists in arranging a whole workspace set-up. We are a perfect one-stop solution for entrepreneurs and business owners. For using our services, visit our website now.
FAQs
Is Cloudflare Good For A WordPress Site?
Cloudflare is one of the best CDN services available for the WordPress site. It offers excellent security and performance-boosting features.
Is Cloudflare CDN Free To Use On WordPress?
The Cloudflare CDN has plans like Free, Pro, Business, and Enterprise. However, the free plan has great features for the WordPress site.
Can I Host My WordPress Site On Cloudflare?
Cloudflare allows the static WordPress site to use its worker’s platform. The platform is developing for dynamic websites as well. However, it is limited now. It will increase in the future.
