If you are running Google Ads or are planning to run them in the near future, having a way to track conversions from those ads would be very convenient. However, many Shopify users have no idea of how to set up conversion tracking for their store sales, or they have it set up but not properly. The absence of a tracking system can make you lose out on a lot of crucial information. It is because you will have no idea about the yield the expenses on your ad campaign are getting for you. You won’t even know if they are even getting you any returns.
Thus, it would be better to properly set up a Google Ads conversion tracking system in your Shopify store. In this blog, we will guide you through the process of setting up Google Ads conversion tracking. We will also give some extra info so that you can avoid things that others don’t.
A Common Mistake While Tracking Google Ads Conversion
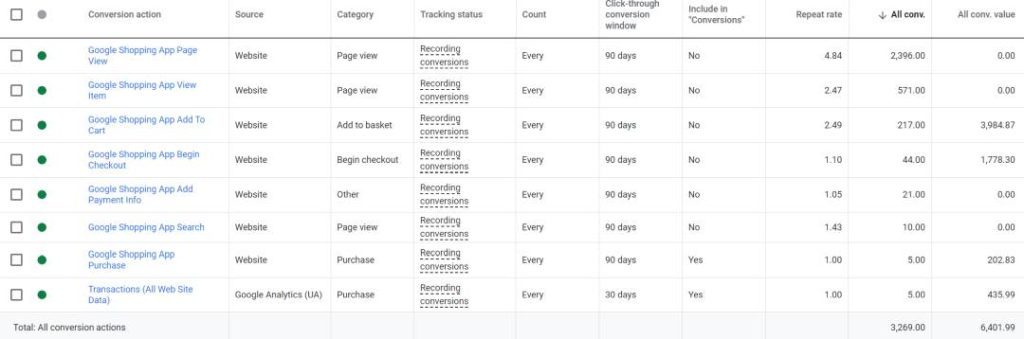
One common mistake that we have seen people making with their Shopify stores is the installation of some 3rd party tracking code. Doing so results in doubling up of purchase data which can cause bloating in the account manager. This is because it starts working alongside Google channel’s conversion codes.
Now you may be wondering why someone would install double conversion codes. The reason is simple, not every Shopify user has the necessary technical know-how and looks for a simple solution. And this simple solution is available to them in the form of a Google channel. However, they do not know that the Google channel installs its own conversion code.
This double installation causes confusion as the user will see doubled-up data when it is actually not. It is also why an accurate tracking system can be very beneficial.
Ways To Set Up Google Ads Conversion Tracking In Shopify
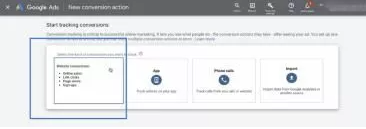
There are three different ways to set up the tracking system for Google Ads conversions in Shopify.
- The first option is to simply import your transactions from Google Analytics as a conversion goal. Since GA provides accurate tracking of sales, it would be a simple and efficient solution. However, this method does not allow tracking of view-through conversions, so not many people use it.
- The second one is the installation of a Google channel in Shopify. It is also the simplest option out of the three and is more foolproof than importing from GA, given that you do not install other conversion channels. In this method, you get many additional conversions that are automatically created. These include options like “Begin Checkout” and “Add to Cart.” However, the one disadvantage of this method is that there is no use of cart data, new customer acquisition reporting, or enhanced conversions.
- The third way is to manually implement the tracking system. The method may be more tedious, but it has its own perks as well. It allows you to have a variety of features, such as editing conversion codes and adding the latest ecommerce features.
Import From Google Analytics
As we mentioned already, importing transactions from Google Analytics is a simple way to track conversions in Shopify. If you are already using Google Analytics to track your transactions, you can import the data using the following steps.
- Visit your Google Analytics set-up for Shopify and get to the source/medium report. Make sure that the conversion data is attributed to Google.
- Now, create a new conversion and click on “Import.”
- You will come across a menu asking for the type of data you want to import. Just select the type with the most accurate data.
- Next, click on “Import and Continue.”
- Check the conversion settings after the goal is created by clicking on the name.
How To Manually Set Up Google Ads Conversion Tracking In Shopify?
Manual set-up may take a bit more of your time, but it’s worth the time as you get plenty of features. Let’s get you through the steps for the manual set-up of Google Ads conversion tracking in Shopify.
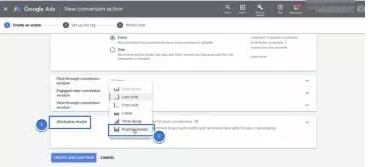
But, before we go through the process of setting up Google Ads conversion tracking, you should know about attribution models. That is because you will have to choose the model while creating a conversion.
Step 1: Create Google Ads Conversion
- At the top right of your Google Ads account, you will find a spanner icon.
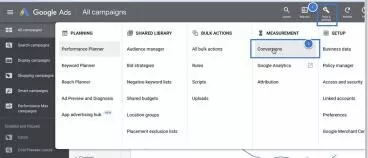
- Go to conversions in the “Measurement” column and create a new conversion.
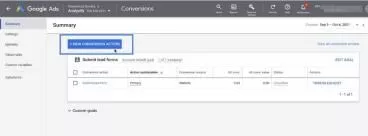
- Now, click on “Website” and enter the domain of your website. Then, click on “Scan.”
- Next, click on “Add a conversion action manually” and fill in the conversion settings appropriately. It includes conversion type, value, and attribution model.

- After completing the process, save the conversion code.
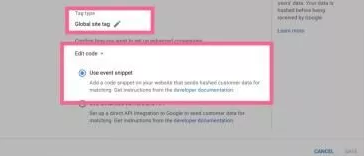
Step 2: Install Global Site Tag
Once the creation of Google Ads conversion is complete, the next is to install the tag in your Shopify theme code. Follow these simple steps to do so.
- Go to the “Set up the tag” in Google Ads and then click on “Install the tag yourself.”
- Select the applicable option in the “Global site tag” section, which will also determine the code generation.
- Now, copy the global site tag.
- Open a new window in your browser and open your Shopify admin. Tap on the “Online Store” and then click the … button to edit the code.
- Next, open the theme.liquid file and paste the global site tag between the <head> and </head> tags. Doing so will apply the tag to every page of your store.
- Finally, click “Save.”
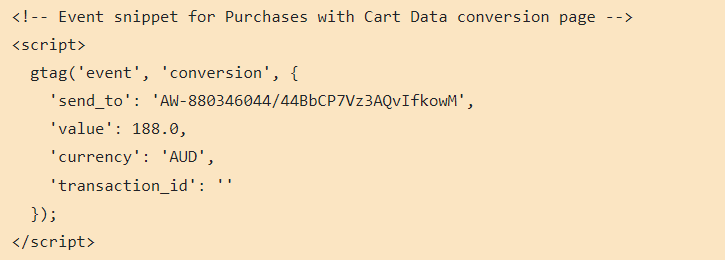
Step 3: Install The Event Snippet
Once the global site tag is installed, next comes the addition of an event snippet for the checkout page. Adding an event snippet will let it track conversions every time someone clicks on the ad and reaches the store’s checkout page.
Follow these steps to install the event snippet.
- Go to Google Ads and then the “Event Snippet” section.
- Choose “Page load” and copy the event snippet code.
- Open a new window in another browser and visit the Shopify admin dashboard.
- In the dashboard, click on “Settings” and then “Checkout.”
- There will be a box for “Additional scripts” where you will have to paste the event snippet. If there is already a code in the box, then add the snippet on a new line below the code present there.
- Next, copy the global site tag in Step 2 and add it above the event snippet.
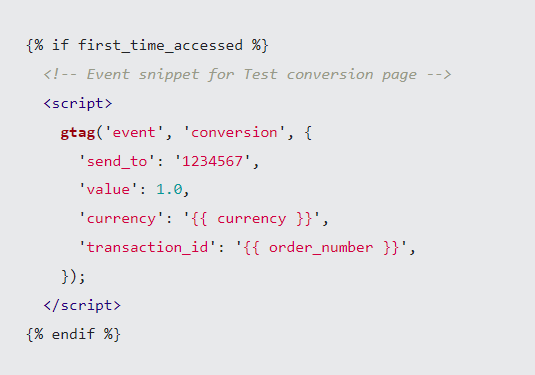
- You can also add tags before and after the snippet to prevent duplicate conversions. It can happen when a customer reloads the customer page. The tag is as follows:
- Copy and paste {% if first_time_accessed %} before the snippet.
- Copy and paste {% endif %} after the snippet.
- You can select the currency as per your preference in the event snippet with ‘{{ currency }},’ or you can leave it as the default ‘USD’ currency.
- The space for the default transaction ID will be blank. You can replace” with ‘{{ order_number }},’ which will prevent duplicate conversions by Google Ads.
- Finalize the event snippet by clicking on “Save.”
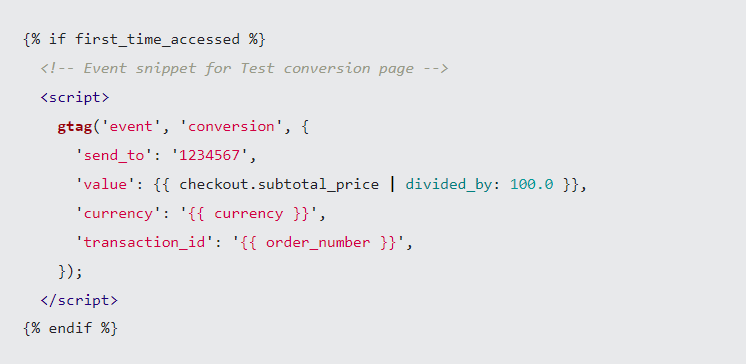
If you have any doubt that you missed out on any of these steps, then here is an example of how your script will look like:
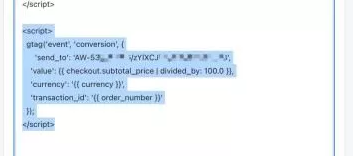
Step 4: Make The Conversion Value Dynamic
The value of each conversion will be different if you are tracking the conversion for online store purchases. Thus, each conversion should have a different value which should be dynamic, as it is not possible to edit the event snippet for each value.
You can make the conversion value dynamic with the following steps.
- Visit the admin dashboard and navigate to Settings> Checkout.
- Find the event snippet which you installed in the previous steps and replace the line that starts with ‘value’: with the following snippets.
- ‘value’: {{ checkout.subtotal_price | divided_by: 100.0 }}. This snippet will exclude taxes and shipping from the conversion amount.
- ‘value’: {{ checkout.total_price | divided_by: 100.0 }}. This snippet will include taxes and shipping in the conversion amount.
- You can choose to insert any of the above snippets based on your preferences.
- Hit “Save”
Have a look at how your script should look so that you can avoid any confusion.
Test Google Ads Conversion Tracking In Shopify
After you are done setting up the conversion tracking in Shopify, the next would be to test the status. There are times when you come across an error that may go undetected and halt the conversion tracking process. You can test it with the following steps so that your scripts do not run into any conflict.
- First, edit the order status page code with this code.
{% if first_time_accessed == true and post_purchase_page_accessed == false %} and put the {% endif %} tag right before the closing.
- Next, load the Tag Assistant.
- Go to the Shopify admin dashboard and view the customer order.
- Now, click on “More Actions” and copy the link address of “View order status page.” Then open up the tag assistant and use the copied link there. The copied URL will appear like this: /authenticate?key=d524ef5bad2b9e7130ff1ccc28886622. It will pass the information of the customer to the page.
- After the test is complete, put the conditional statement back to where it originally was.
Additional Step: Enhanced Conversion In Google Ads
We already showed you how you could create conversions; however, Google has introduced Enhanced Conversions for accurate tracking. It also allows better attribution with the hashed data in your account. To enable this feature for your Shopify store, follow these steps:
- Select the new conversion you created on the conversions page.
- Then click on “Enhanced Conversions” and turn it on by checking the box.
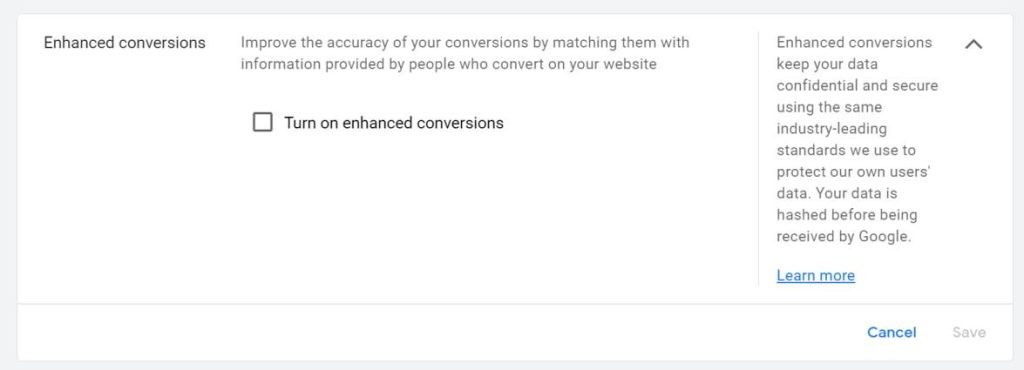
- Next, click on the Google Tag Manager or Global Tag and hit “Next.”
- Visit the customer order section in your store’s admin dashboard. Select “View order status page,” which you will find under “More actions.”
- Also, you can check the URL by copying and pasting it into Google Ads.
- Then click the option of “AW-GOOGLE_CONVERSION_ID” and hit “Next” again.
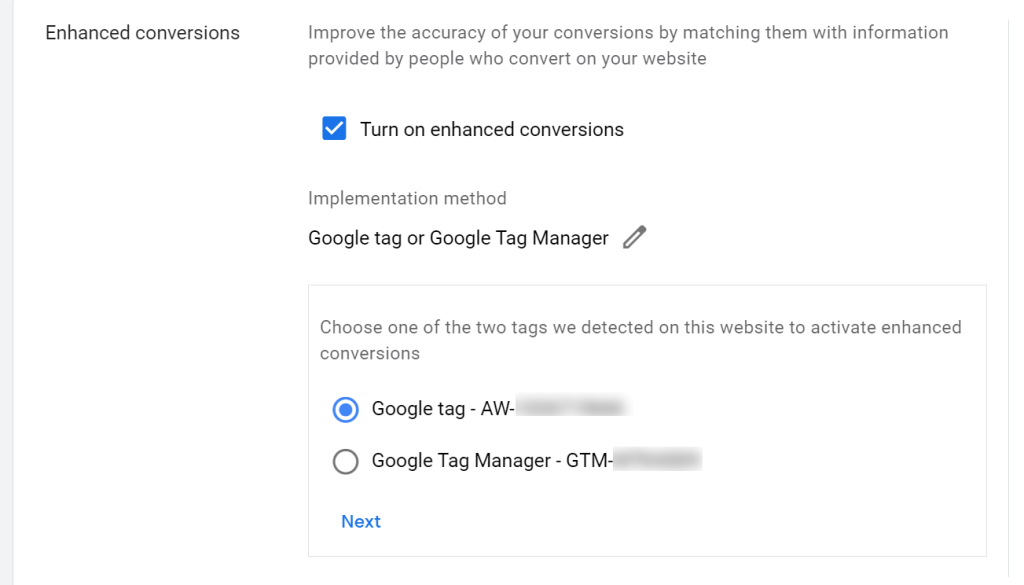
- Click on “Edit code” when the prompt asks you to set up enhanced conversions and then “Save.”
More About Attribution Models
One step in creating a conversion involves deciding the attribution model you want to use. To make the process easier, let’s brief you on the different models, as they can determine how effective your ad campaign can be.
Here are all the attribution models with their features.
Linear
This model is good for someone setting up attribution for the first time. The distribution of sales in this model is even across every customer interaction during the purchasing cycle.
First Click
In this model, the attribution goes to 100% of the first touch point of the customer. It is useful when you want to find out how the customers find you. However, if there is more than a single click by the customer, this model will not be able to tell the cause of the sale.
Last Click
As opposed to the first click model, the last click model gives a complete attribute to the last customer interaction. Many retailers prefer using this model as it tells them about the last interaction that led to the conversion. However, there is no single channel for sale these days. So, the last click will not be able to give complete information as well.
Position-based
This model makes use of all the above models. However, the majority of the conversion splits between the first and last click. The remaining portion of the attribution is to the middle of the funnel. It may work for many retailers. However, it lacks the middle points of interaction, which may not be good for expensive items.
Time Decay
It is the most complex attribution model out of them all. The highest priority of this model is on the last click, and the remaining portion attributes to other touch points. Also, the interaction which is the most distant from the conversion gets the least attribution. The model is great for the seller whose customers take a long time to make a purchase.
Data-Driven
This model uses real data for automated attribution. Google uses various data points to build an attribution model for you. However, to access this model, the minimum requirement is to have 600 conversions through a single conversion in the span of 30 days. It is a very flexible model, and you should use it whenever it becomes accessible.
FAQs
Does Google Ads automatically track conversion?
Google Ads can automatically track conversions with the auto-tagging feature. It will let you track your website conversions. You can check the effectiveness of your ad campaign, which is getting you conversions.
Why is Google Ads not tracking conversions?
If you have not imported your set-up goals into AdWords, it may cause Google Ads to be unable to track your conversions. Thus, make sure that your Google Analytics and Adwords accounts are linked. If they are, import the goals into Google Ads and set them up for conversion tracking.