
Mail merge is an effective solution that helps the user to create multiple emails with the present data in a database file or spreadsheet. If you are looking for a quick solution to sending multiple personalized emails to a long mailing chain, then you need to know how to merge mail in Outlook.
So, if you don’t want to use your time writing the exact email for multiple individuals, you can try using the mail merge feature in Outlook.
In the step-by-step guide, learn how to set up a merge mail in Outlook.
Starting The Process To Set Up The Mail Merge
Microsoft Word is the most favorable method to set up a mail merge. You can use Outlook for all the mailing addresses. Moreover, for this process, you can enter the mail dress into the list.
Step 1: Composing The Email
The first step to merging mail in Outlook is to compose a mail of your liking. You can use the Word document to type in the message. Your first step also consists of starting the mail merge. Ensure to follow these steps:
- Firstly, turn on “MS Word” on your system.
- Next, write the message for the mail body in the document.
- Leave the parts that you want to personalize inside the mail. You can do this laterwards.
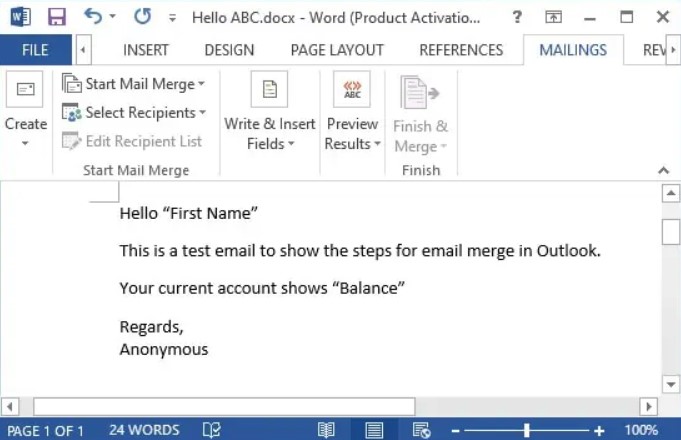
- After that, ensure to save the file to the drive.
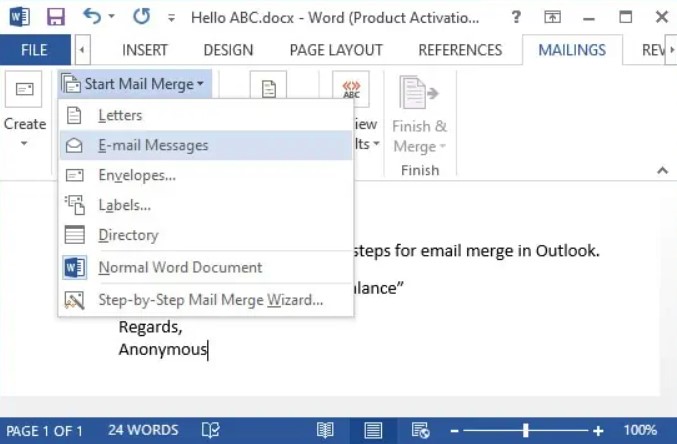
- Now, press the “Mailings” tab from the menu bar.
- Finally, tap the “Start Mail Merge” option and choose Email Messages.
Step 2: Forming the Mailing list
You can head to the next step if you already have a contact list in your Outlook. With Word, you can either make a completely new list or use the one you already have. Now, the list can be a database, an Excel sheet, or other types of documents containing entries in a structured way.
Follow these steps to make an Excel spreadsheet for your list:
- Firstly, start a “blank workbook” by opening “Excel.”
- Next, add individual columns containing contents and headers for the information you need to personalize. Ensure to make a field for email as well.
- Now, fill in the data in the blank fields.
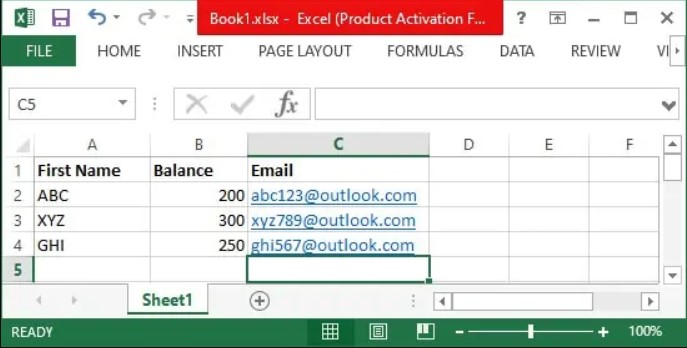
- Moreover, ensure to use a “single sheet” only for all the entries.
- Finally, “Save” the sheet with a new file name.
Step 3: Choosing the Recipients for the Email
In this step, you will connect the mail merge with the recipients or reviewers. For this, you can use three different methods, i.e., making a new list, using the existing one, or taking from outlook contacts.
For the users who consist of Outlook contacts, ensure to follow these steps:
- Firstly, head to the Word document consisting of the body of the message.
- Next, go to the “Mailings” tab and tap on “Select Recipients.”
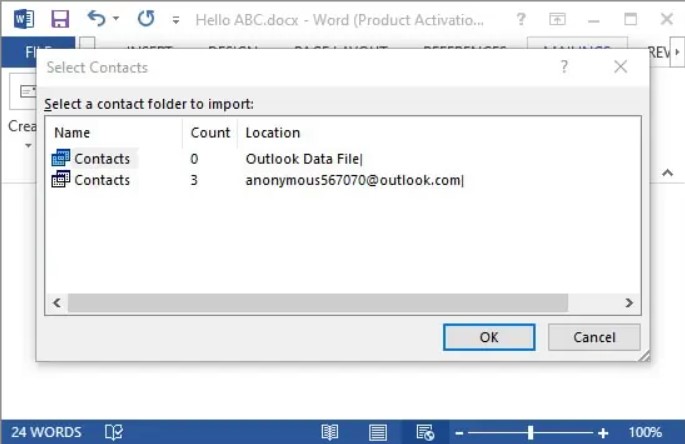
- Now, click on “Choose from Outlook Contacts.”
- After that, select a “Profile Name” in case you must.
- Continue by clicking the “Ok” button.

- Now, log in to the account.
- Since you will have multiple contact lists, ensure to select those you need and tap on the “Ok” button.
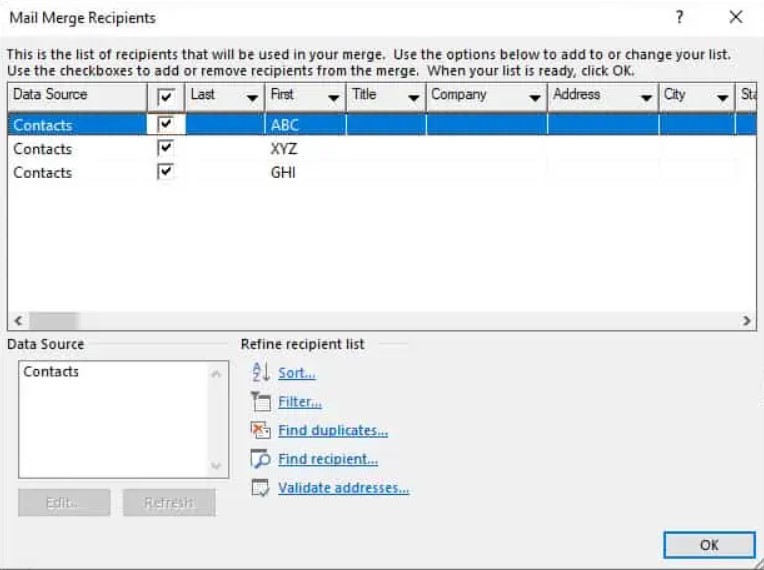
- Next, use all the new window checkboxes to pick the recipients for the mailing list.
- Finally, hit the “Ok” button from the bottom.
If you are looking to make a new list, you can follow these steps:
- Firstly, from the “Mailings” tab, tap on “Select Recipients.”
- Next, click the “Type a New List” option.
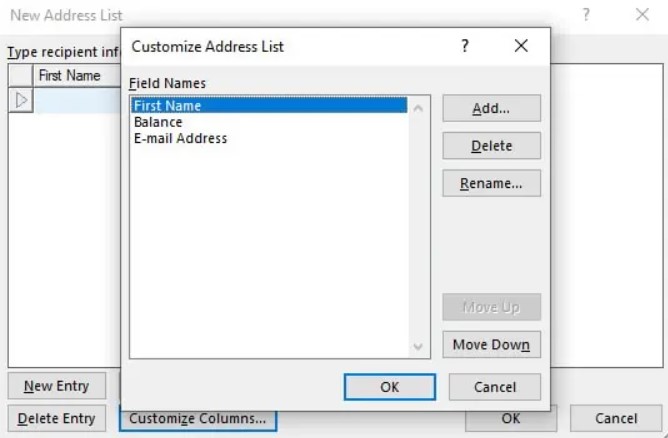
- Now, hit the “Customize Columns” button.
- After that, arrange the “field name” by using the “Rename, Add, and Delete” buttons.
- Hit the “Ok” button.
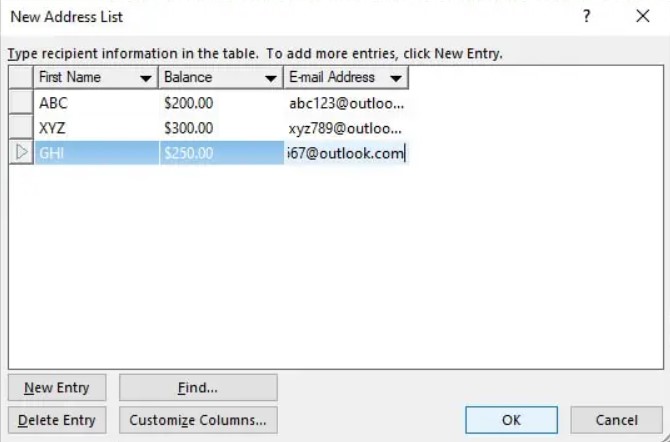
- You may now fill in the data as per your need. Use the “Delete Entry” and “New Entry” buttons to change the entries.
- After that, press the “Ok” button.
In case you made a list through another source, continue to follow these steps:
- Firstly, head to the “Mailings tab” and tap on “Select Recipients.”
- Next, choose the “Use an Existing List” option.
- Now, head to where the list is saved and open it.
- After that, choose the sheet which has the contacts on it and tap “Ok.” If you are following the guide from the start, you will only have one option.
- Ensure you checkmark the “First row data contains column headers.”
- Finally, edit and check your list by going to “Start Mail Merge” and clicking “Edit Recipient List.”
Read Also:- How To Change Domain In Zoho Mail: A Comprehensive Guide
Step 4: Filling In Mail Merge Spaces
In this next step, you must write down the placeholder you will use in the mail. You also have the option to include a personalized salutation. In order to do this, follow the below instructions:
- Firstly, choose an individual in your mail.
- Next, head to “Write & Insert Fields” and tap on “Insert Merge Field.”
- Now, select the matching field and tap on “Insert.
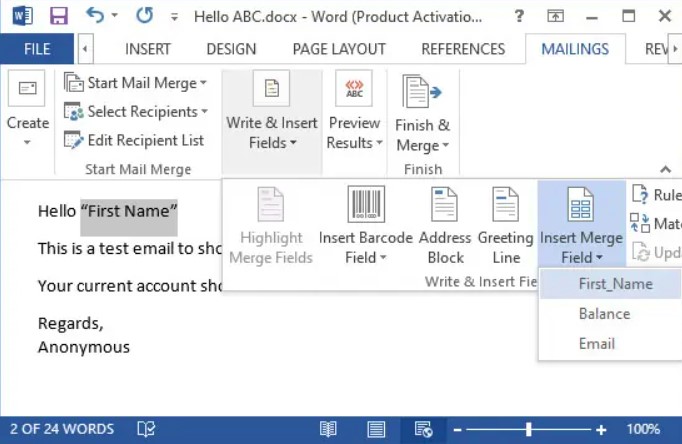
- You don’t have the option to change your document insertion point. You need to add the merge field individually by selecting a placeholder. Furthermore, you need to repeat this for each.
- Ensure to follow all the steps for every placeholder.
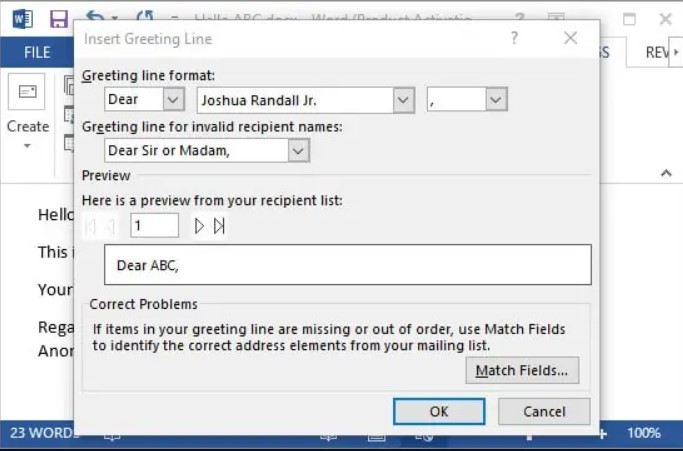
- In case your message doesn’t consist of a greeting line, you might like to add one.
- Tap the “Greeting Line” option.
- Now, format all the options as per your need from the new window.
- Finally, hit “Ok.”
Step 5: Preview The Email
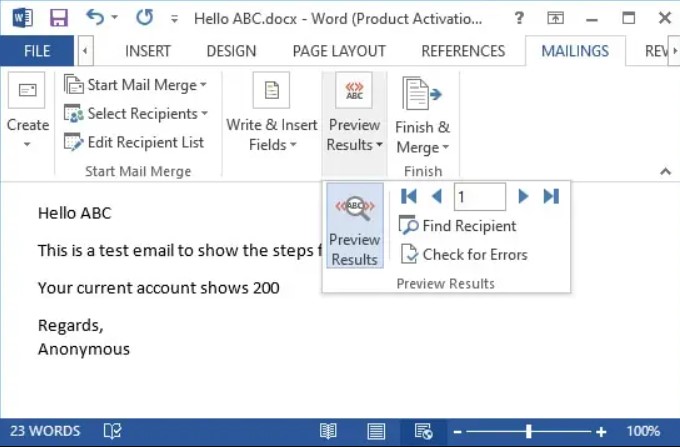
Before you send the emails to the recipients, ensure to preview the mail so you can figure out any errors. Follow these steps to view the mail merge:
- Firstly, head to the “Mailings” tab and tap the “Preview Results” option.
- Next, you will be able to watch an example of the mail you are sending to the recipient.
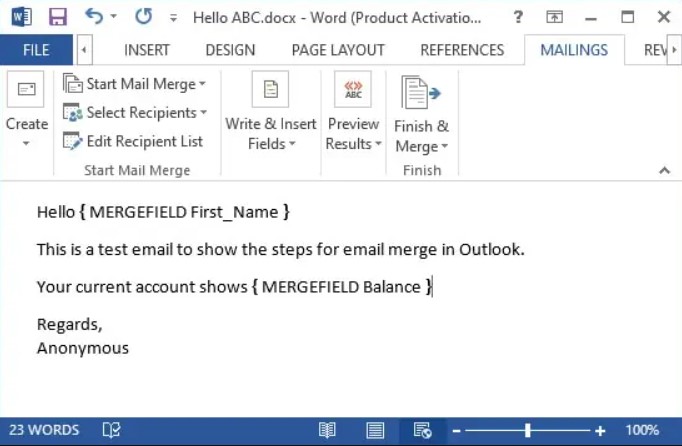
- The value’s format might not be of your liking and need. For example, currency value could look like a whole number.
- For such a scenario, hold “Alt + F9.” Others need to hold “Alt + Fn +F9.”
- Now, the field codes will be visible to you for the Merge Spaces.
- Next, you must change the field code. There are different codes for various values. Browse the internet to look for their particular syntax.
- For instance, you must write “\# $,0.00” inside the code for a change to currency value.
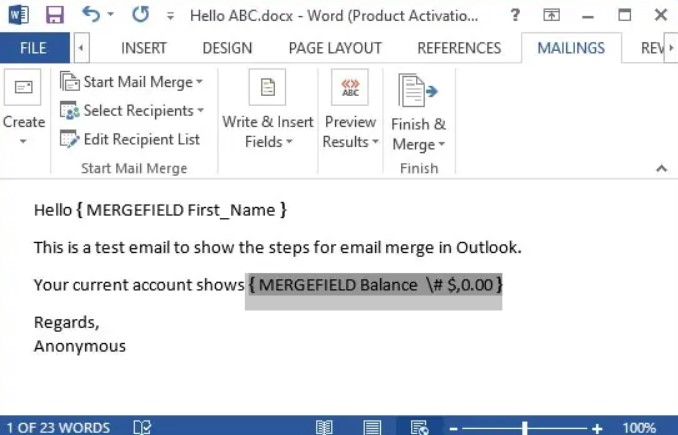
- Now, again, hit “Alt + F9” and tap “Preview Results” to preview the new changes.

Step 6: Complete And Save
Now, for the final step, you have to finish setting up your email, write in the subject and send the email. You also have the option to mail merge to a different document or print out the mail in case you need it. Follow these steps to finish the process:
- Firstly, go to the “Mailings” tab and tap the “Finish & Merge” option.
- Next, click on “Edit Individual Documents” if you want to preview or edit all your documents. Skip this part if there is no need to change anything.
- Now, once you have made all changes, turn off the window.
- Afterward, hit the “Save” button to apply the changes.
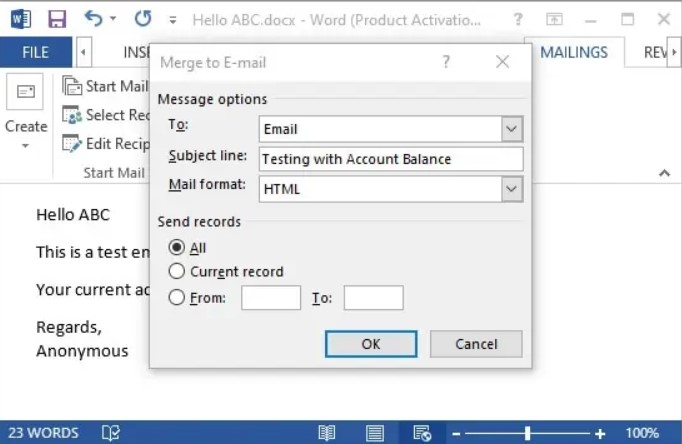
- Again, tap on “Finish & Merge.” However, choose “Send Email Messages.”
- Moreover, enter the subject into the “Subject line.”
- Hit the “Ok” button to send out emails.
- If you have to send emails to a big group of recipients, sending to fewer receivers at a time is recommended. Follow the “From___To___” option available in the “Finish & Merge” tab.
- You may save the file for future use if you want.
Conclusion
So, now you know how to merge mail in Outlook? The process to merge mail in Outlook is pretty straightforward, although you need some Word document experience. After completing the mail, ensure to preview it to check if there is something that needs changes.
Zone Websites is a hub for all your digital marketing needs. We offer regular guides and online marketing solutions to our clients. If you also need to grow your business and create an online presence to increase your customer chains, visit us today.
Frequently Asked Questions
How To Perform A Mail Merge From Excel To Outlook?
Follow these steps if you want to mail merge from Excel to Outlook:
- Firstly, head to the “Mailings” tab.
- Next, select the “Address Block” option.
- If you want to add a greeting line, select the “Greeting Line” option.
- For adding another field, such as invoice number, head to “Insert mail merge fields.”
- Now hit the “Ok” button.
- Select “File” and hit “Save.”
How To Send Bulk Emails By Using Outlook?
Follow these steps to send bulk emails using Outlook:
- Firstly, enter your message in the Word document. Start Word and type in the email body.
- Next, start the “Mail Merge” process. Once the email draft is ready, proceed with the other steps.
- Now, choose the email recipients.
- After that, make the changes in the mail per your needs.
- Finally, merge your mail and review it before you send it.
How Do I Merge Boxes In Outlook?
If you want to merge inboxes of different accounts in Outlook, follow these steps:
- Firstly, tap “Add File” in order to load PST files.
- Next, press the “Merge: option and hit “Next.”
- Now, click on the needed folders.
- Choose filters as well as duplicate criteria.
- Finally, tap “Next” to proceed with the process.