
Are you overwhelmed seeing the complicated stuff filled with coding after searching for how to host multiple websites on one server? Well, surely no one wants to jump into it because of how scary it can look at first glance. But is hosting multiple websites on one server really as difficult as it seems? This can be before you have landed on this post! If you are from a non-tech background and don’t understand complicated stuff like this, you are definitely not alone. But, through this guide, you will no longer fear the topic of hosting more than one site on one server.
Here we will mention five quick steps by which you can achieve what you came from without spending much time in the process. However, before we discuss these steps, we must first answer so as to why you must consider hosting multiple websites on a single server.
Why Should You Host Multiple Websites On One Server?
For sure, if you have landed on this post, you may have some idea of why hosting many websites on one server is good. However, what about those individuals who don’t have a clue why they have to do this? So, here are two major benefits of hosting multiple sites on a single server:
1. You Get The Convenience Of Controlling All The Sites From A Single Location
Well, everybody loves to make some extra bucks. And having multiple websites means you get more opportunities to earn from various platforms and sources. However, these good-looking websites can give you headaches as they involve logging in and logging out multiple times during a single day.
Undoubtedly, you can get your hands on tools that help manage your website’s login details. However, things can become too repetitive and time-consuming as the process continues. So, if you are playing the role of a WordPress admin, you would want to make things convenient by getting access to all these sites from a single place only.
Hosting all your sites on one server allows you to manage all such website stuff using one dashboard only.
2. You Can Save A Lot On The Costs Of Hosting
If we talk about hosting costs, they may not sound much, primarily if you are operating multiple websites while managing enough profit. However, over time you will realize that this cost can be pretty high.
Let’s understand this using a simple example. Suppose you own around ten websites, and their hosting costs $5 each/per month. So, in total, you are spending $50/month for all your website hosting, which may not sound like much. In a year, this cost can go up to $600, which is a good amount. However, in terms of five years, you are paying $3000 for all your website hostings which is quite a significant amount.
The best way to cut down this hosting cost is by hosting all the domains you have on a single server. By doing this, you will save a significant amount on hosting costs.
So, these were two significant benefits of hosting all your sites on one server. Next, let’s see how you can do this without jumping into complicated stuff.
Hosting Multiple Websites On One Server Using Easy Five Steps
In general, there are five steps you must take to host many websites on a single server. These steps include:
- Purchasing Domain Names As Well As A Shared Hosting Plan
- Adding A Domain To The cPanel/Server
- Updating the nameservers
- Installing WordPress on the server
- Setting Up The Basics On The WordPress Sites
Let’s start with the first step of hosting multiple domains on one server without wasting any time.
Step 1: Purchasing Domain Names As Well As A Shared Hosting Plan
So, to start the process of hosting many domains on a single server, there are two things you must do:
- You need to purchase a shared hosting plan
- You must purchase the domain names which you prefer to add
So, let’s see what both of these entail:
Purchasing A Shared Hosting Plan
Buying the right hosting plan is vital, as not every plan out there can allow you to manage and host multiple sites on a single server. Suppose you’re already running a hosting plan which doesn’t allow you to host multiple sites on one server. In that case, you will need to upgrade your hosting plan to the one which can allow you to do that.
Furthermore, if you’re unsure of which hosting plan is the best currently, we have multiple options for you through which you can choose.
So, here are the best hosting plan providers with their expected prices:
- Bluehost ($2.75 per month)
- DreamHost ($2.59 per month)
- ZoneWebsites (request a quote)
- A2 Hosting ($2.99 per month)
- InMotion Hosting ($2.99 per month)
For the usual cases, when you are using a shared hosting plan, you have access to unlimited storage. So, it simply means that you are allowed to host multiple websites as much as you want.
However, you must know there is a certain limit to the files and data amount that can be allowed by your bandwidth resources. In some cases, your websites may not give out their best performance due to a lack of available resources.
But, even if that is the case, you are getting to host numerous sites on one server, and you can use it effectively if you do things smartly.
Purchasing Domain Names That You Wish To Add
Now, if you want to add domains to the server, you first need to purchase them. Here, it is up to you what type of domain names you prefer for your website and what you wish to add to the server.
Again the question arises from where can you buy the best domain names for your site? Here are some top options for purchasing domain names:
- ZoneWebsites
- Namecheap
- Hover
- Domain.com
- Bluehost
So, now you have both hosting as well as the domain names of your liking. It’s time we move to the next step of hosting multiple websites on one server.
Read More:- How To Fix DNS_PROBE_FINISHED_NXDOMAIN In Different Browsers?
Step 2: Adding A Domain To The cPanel/Server
For this second step, you have to log into the cPanel of the hosting service.
- Firstly, head to the “Domains” section.
- Then, tap on the “Addon Domains” icon.
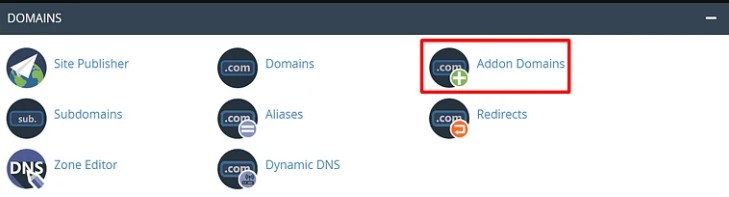
- Moreover, wait for the “Addon Domains” page to appear.
- After that, add the new domain to the “New Domain Name” and “Subdomain” sections.
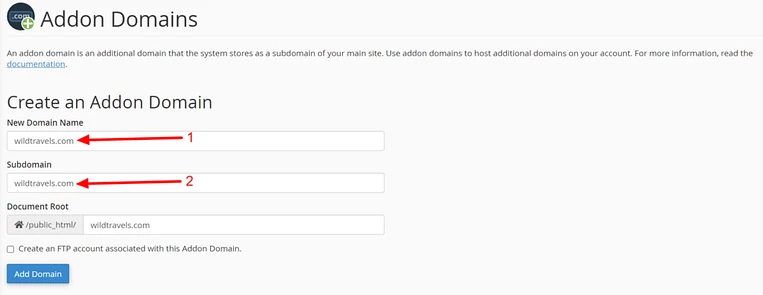
- Once you finish adding your domain name, tap on the “Add Domain” button.
- Now, wait for the success message to appear on your screen.

Adding a new domain to your hosting can take some time, depending on who you choose as your hosting provider. So, you need to be patient with successfully adding your domain to your hosting.
Typically, it takes around one or two minutes for a new domain to occupy. That’s why you must know it is completely normal if a success message doesn’t appear on your screen right away.
In order to verify if things are done correctly, click on the back button. Now, you can see the new domain added under the section “Addon Domains.”

Now, follow the same steps mentioned above to add multiple domains to a single server.
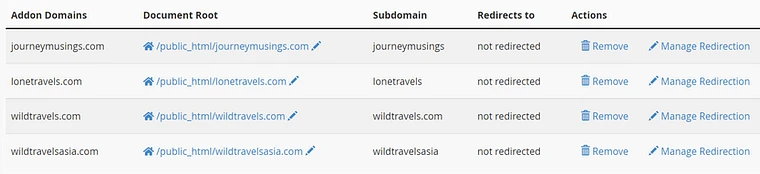
In the future, if you want to remove a domain from this server list, simply click on the “Remove” button with a trash icon, which you will find in the “Actions” column.
Step 3: Updating The Nameservers
For step three, you need to update the nameservers.
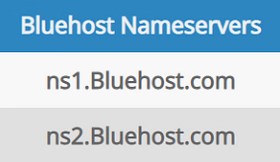
You may ask what updating the nameservers have to do with hosting your sites on a single server. Well, you need to update it so as to explain to the domain registrar which particular server they have to point to or direct the domain to. Let’s take the example of Bluehost to understand this.
One thing you need to remember is you have to update the nameservers for each domain that you like to set up on a single host. Let’s consider an example. Suppose your domains are registered with multiple registrars. In that case, you need to head to the nameserver setting for each of your domains and direct them to the new server. Here, the new server is the one where you want all your domains together.
But how will you do this process? Well, let’s use the Bluehost example to understand how you will point your domains to the new server.
- Firstly, head to the “Domains” menu present on the left side of the dashboard.
- Then, click on the “DNS” tab.
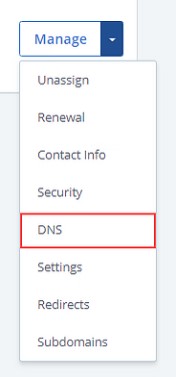
- Moreover, move to the “Name Servers” space.
- Next, hit the “Edit” button.
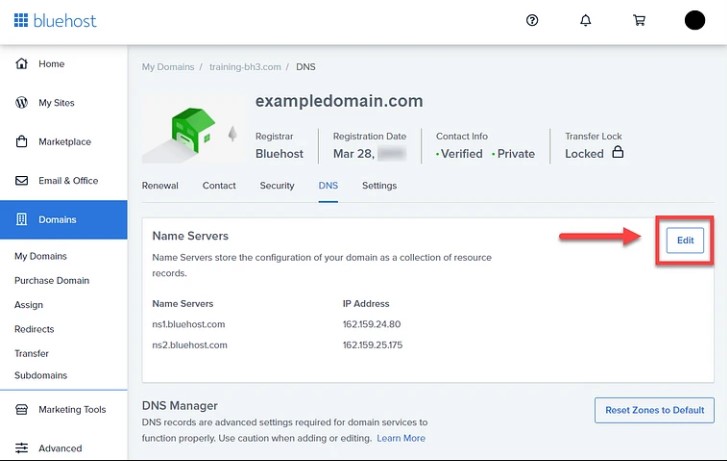
- Now, head to the “Setup Type” section.
- From there, select the “Custom Nameservers” option.
- Then, enter your account’s nameservers.
- Finally, hit the “Save” button to complete the process of updating the nameservers.

Now, you have successfully redirected the domain names to that particular server where you want to host your sites.
Step 4: Installing WordPress On The Server
For step four, you need to have WordPress on your new server.
Now, do you think installing WordPress is something only WordPress developers can do? If that is the case, you must change this thinking immediately! Getting WordPress on a server was difficult, and people ignored its installation as it was too tricky for them to handle. However, all this is a thing of the past, and you don’t have to worry about it anymore.
You have your hands on modern technology now, giving you access to things with a single click without any external help. Therefore, getting WordPress installed on your server is something you can do yourself without giving a penny to the costly developers.
However, you have a variety of choices for installing WordPress. Finding your preference for getting it installed is time costly. But we are writing this guide, so you don’t waste a second completing this process.
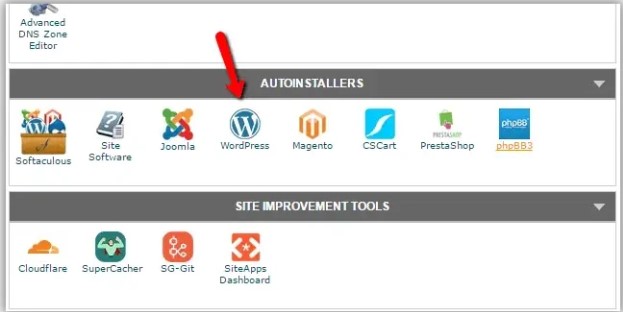
Hence, we have chosen the best course for you by taking the help of cPanel autoinstaller for installing WordPress on your new server. So, here are the steps you need to follow in order to install it:
- Firstly, you need to log in to the cPanel dashboard.
- Then, navigate to the “Autoinstallers” section.
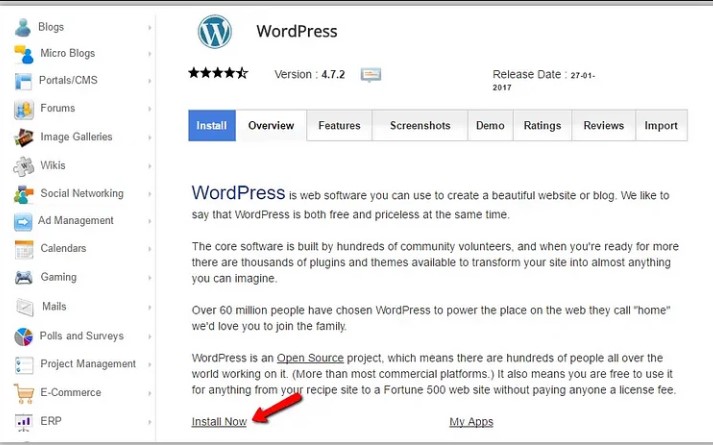
- Moreover, tap on the “WordPress” icon.
- After that, hit the “Instal Now” button.
- Next, tap on the “Choose Protocol” button.
- Now, select the “SSL certificate” for a safe HTTPS website.
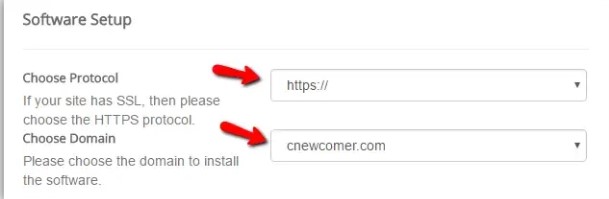
- In case your website lacks an SSL certificate, select the default http.
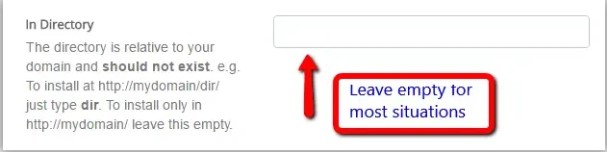
- Ensure you leave the “In Directory” section blank.
- Next, head down to the “Site Settings” portion.
- Now, enter the “Site Name” as well as the “Site Description” in particular boxes.
- Just type in the basic details, as you can always update them later.
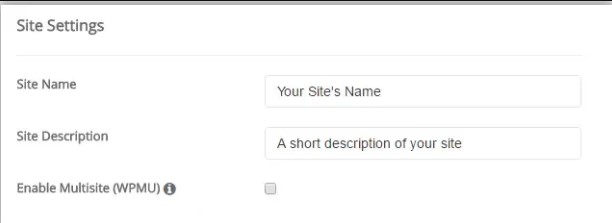
Make sure you don’t tick on the “Enable Multisite (WPMU)” box, which you see above. This may surprise you, as we are discussing hosting multiple websites on one server. However, this option has nothing to do with that process. Furthermore, WordPress Multisite is one of the specific versions you find for WordPress. Therefore, you don’t need to enable it, as you will have no use for it.
For the final step of WordPress installation, you must assign a user for the website. Also, you need to type in a password, or you can use the one which is suggested.
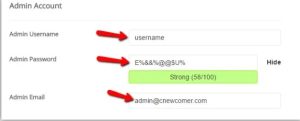
You may already know this, but still, as a reminder, keep your password somewhere at a secure location that you can always access whenever needed.
And this ultimately completes the WordPress installation on your server. Wasn’t this easier than you thought it would be? But anyway, congratulations on a successful WordPress installation!
Step 5: Setting Up The Essentials On The WordPress Sites
Well, if you have made it to the fifth step, you are almost done with the process of how to host many sites on one server. But, in order to do that, there are some basic setups you must do on WordPress to make it suitable for your server.
So, as per your preference, you must configure all the basic WordPress settings. And here are the essentials you need to look into:
- General Settings: This covers your tagline, site title, language, admin email address, website address, and other things like that.
- Reading Settings: This covers the search engine visibility, blog posts number to be displayed per page, and the home page displays.
- Writing Settings: This covers the default editor that users can use, access to the power to forward posts using email, and the blog post formats and categories.
- Discussion Settings: This covers comment and post configurations that decide how individuals engage with you and interact with the content you publish.
- Permalinks Settings: This covers how you can make a custom URL configuration for the archives and permalinks.
- Media Settings: This covers how you can attach media files to your content and media library.
- Privacy Settings: This covers how you can establish a privacy policy for the site.
And that’s it, folks, for how to host multiple websites on one server. We hope this guide was helpful for our WordPress users. Now, let’s discuss some related topics on installing multiple sites on a server.
How To Host A Website On GitHub?
If you are looking to host your website on GitHub without paying a dime, you’ll love using GitHub Pages. This is an entirely free service that allows individuals to host their site directly from the GitHub repository. Furthermore, you can easily make your site available on the internet using GitHub pages.
So, let’s see the steps you must take to make your site accessible online using Gitpages.
Step 1: Making Your GitHub Account
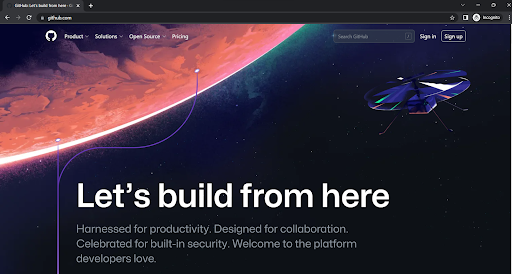
- Firstly, open your browser and enter “github.com.”
- Now, tap on the “Sign up” option from the top and enter your details.
Having a free GitHub account is essential in order to establish a GitHub repository, which we will talk about in the second step. The role of a repository is to hold your website files that have to be published.
Step 2: Establishing A GitHub Repository
If you’re reading this second step, we assume you have already created your GitHub account. Now, for this step, you must establish a repository:

Simply, you have to mention the repository name, which will make you completely set for the next few steps. However, note that you must specify the name in the format “username.github.io.” You can either write your name or the organization in the username section on GitHub.
Now, tap the “Create repository” button to start the creating process.
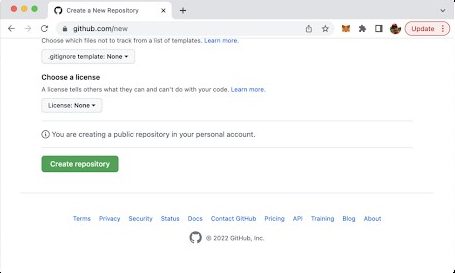
Once the making process ends, you will be redirected to a website that will look something like this:
Step 3: Making A Local Folder And Cloning Your Remote GitHub Repository
So, it is time we move to the command line, as the GitHub repository is available to you. Furthermore, we need to create a new folder which we will use later to store the website files which have to be hosted on Gitpages.
Firstly, you need to enter the “$ mkdir my-website” command. This makes you ready to clone the repository into the local folder. You can do this by using the “$ git clone https://github.com/[username]/[username].github.io” command.
Now, Git will show that the repository you’re cloning is empty. You don’t have to worry about it, as we still need to add files to it.
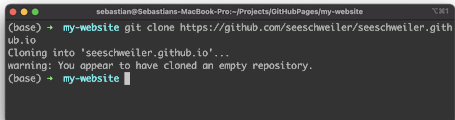
Make sure you change it into the freshly created subfolder.
Step 4: Adding The Website Files Inside The Folder
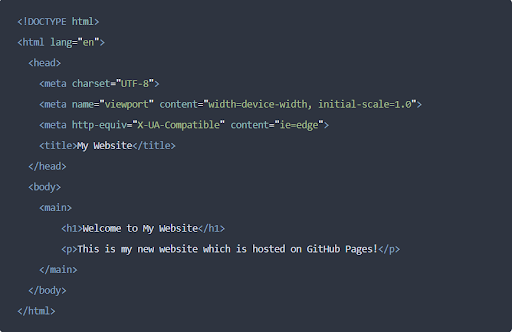
So, as we are on the fourth step, let’s add content to the newly created folder. However, since we don’t want to complicate things, we will use only one basic HTML file (index.html) for our test site:
“$ touch index.html“
Afterward, you need to enter the following HTML code into “index.html.”
<!DOCTYPE html>
<html lang=”en”>
<head>
<meta charset=”UTF-8″>
<meta name=”viewport” content=”width=device-width, initial-scale=1.0″>
<meta http-equiv=”X-UA-Compatible” content=”ie=edge”>
<title>My Website</title>
</head>
<body>
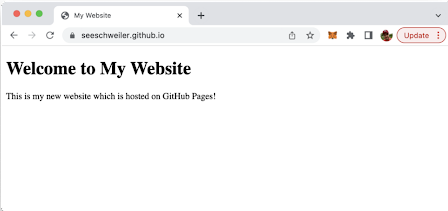
<main>
<h1>Welcome to My Website</h1>
<p>This is my new website which is hosted on GitHub Pages!</p>
</main>
</body>
</html>
Step 5: Pushing The Files To The GitHub Repository
For the fifth step, you need to add, commit, as well as push the newly created file toward the GitHub repository (remote) by entering the following command:
$ git add — all
$ git commit -m “Initial commit”
$ git push -u origin master
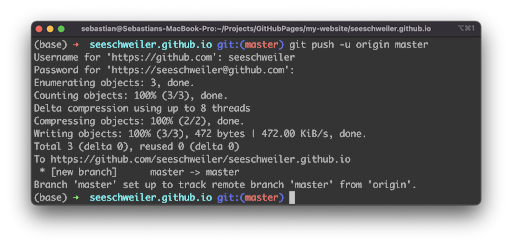
Step 6: Accessing The Deployed Website In The Chrome Or Other Browsers
Since you have already pushed the website files to the GitHub repository, the process of deployment is automatically done. Therefore, there is no further step you need to make.
Your website is now available online. You can access it with any browser by entering the URL “https://[username].github.io/.”
And with this, now you know how to host a website on GitHub without paying anything using Gitpages.
How To Host Multiple Sites On A Single Server: Apache
Although we have already discussed the WordPress part, many users often look to host multiple websites using the Apache web server. So, suppose you’re in that boat. In that case, we can help cross the complicated river of coding with these simple steps on how to host multiple sites on a single server using Apache.
Step 1: Establishing The Directory Structure
Creating the directory structure is highly important as it stores your website data. And this stored data is the only thing the visitors see after visiting your site. Out of all the directories, the top-level directory is “Document root.” It is standard for Apache to look for the content in the document root to present it in front of the website visitors.
Know that the document root is positioned to “individual directories /var/www.” Also, you can form a directory for all the websites you are looking to host on one server.
- Firstly, for each set of directories, you need to make a “public_html” folder. These folders will have real site files, which will provide you with more flexibility.
- Next, make the “/var/www folder” as it will work as the location for the document root.
- Then, substitute the domain names like “domain.com” and “domain2.com.”
“mkdir -p /var/www/domain.com/public_html“
“mkdir -p /var/www/domain2.com/public_html“
Step 2: Setting Up Permissions
- Once you have created the directories, you need to give out the right permissions.
- There are chances that the root user may contain the directories.
- Any user must be able to modify or change the files present in the web directories.
- Finally, to change the permissions, you have to permit the following rules:
“chmod -R 755 /var/www”
Step 3: Setting Up The Index Page
If you want to see certain content, you have the ability to make a “demo index page.”
- Firstly, create an index.html file for all your “valid domains” for your websites:
“vim /var/www/domain.com/public_html/index.html“
- Now, within your files, you can position something like “example testing for domain.com.”
- Next, “save and close” the file in order to exit through the ESC tab and by typing:wp.
- Moreover, you have to repeat the same steps for your second domain. Type in the following command:
“vim /var/www/domain2.com/public_html/index.html“
Step 4: Copying The Configure File For All The Sites
As you are using the Apache web server, you get the “default virtual host” file using it known as “000-default.conf.”
- Firstly, you need to copy the default file to establish a “virtual host file” for all your websites.
- By doing this, you can make sure that you contain a “default copy” for each website.
“cp/etc/apache2/sites-available/000-default.conf/etc/apache2/sites-available/domain.com.conf”
“cp/etc/apache2/sites-available/000-default.conf/etc/apache2/sites-available/domain2.com.conf”
Step 5: Editing The Configure File For All the Sites
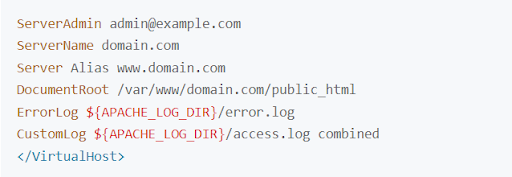
You have the ability to modify the items of the first domain. Furthermore, you can add additional directives.
- Firstly, add two directives like “ServerName” as it assists with setting up the base domain.
- After that, add “Server Alias,” which will work as an alternative name for the base domain.
- Doing this, you can assist with matching the hosts you have defined, like www:
“ServerName: domain.com” “Server Alias: www.domain.com“
“vim /etc/apache2/sites-available/domain.com.conf“
- Once you’re done with this, your “Apache virtual host file” will appear on the screen like this:
- Now, save your changes and exit using “:wp.”
- Then, you must repeat all the previous steps for your “domain2.com.conf file.”
Make sure for your second domain; you add the “Server Alias,” “DocumentRoot,” and “ServerName.”
Step 6: Enabling The Configure File
In order to enable the “virtual host configuration files,” make sure to stay stick with the following steps:
- Start by disabling the “default site,” which is defined in “000-default.conf:
a2dissite 000-default.conf.”
- After that, use the tool which Apache includes to enable the “new virtual host files.”
- Next, take the help of “a2ensite docs” to allow the new .conf files.
“a2ensite domain.com.conf”
“a2ensite domain2.com.conf”
- You have to restart the configured Apache service to see the new changes. Furthermore, you can take the help of systemctl status to confirm the changes.
“systemctl restart apache2“
Step 7: Verifying/Testing Apache Configurations
Once you finish restarting Apache, make sure to verify the working of configurations. You can confirm it by editing the “domain” or “/etc/host” file.
Your browser will display the “index.html” pages that are positioned in the last steps.
If you notice that both sites are working fine with no issues, you have successfully executed the steps. So, with that, you have finished configuring two virtual hosts on a single server using Apache.
How To Host Multiple Sites On A Single Server: NGINX
Now, if you’re using the NGINX server, know that the steps remain pretty similar to what we discussed in the Apache server. So, if you want to configure multiple virtual hosts on a single server, here is the step-by-step process to achieve it.
Step 1: Making Document Root Directories
Firstly, you need to make two separate document root folders for both domains:
“$ sudo mkdir /var/www/html/example1.com”
“$ sudo mkdir /var/www/html/example2.com”
Your request for the example1 domain will be served from “/var/www/html/example1.com.”
Your request for the second example site will be served from “/var/www/html/example2.com.”
Step 2: Establishing index.html Files
For step two, you have to make “index.html” files for both domains. So, if we take the example1 domain, you need to enter the following command.
“$ sudo vi /var/www/html/example1.com/index.html”
“<title>www.example1.com</title>
<h1>Welcome to www.example1.com Website</h1>
</html>”

Now, Save your file, and after that, close it to confirm the changes.
Also, for the second example website, you must repeat the same steps mentioned above.
Step 3: Opening NGINX Configuration File
For the third step, open the “NGINX config.” file at “/etc/nginx/nginx.conf.” Now, in order to achieve this, enter the following command:
“$ sudo vi /etc/nginx/nginx.conf”
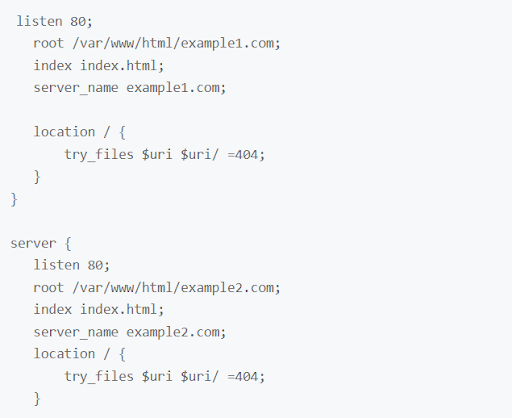
Step 4: Creating Server Blocks
For this step, you need to make two server blocks for both domains.
Now, if you don’t know, you can change the values for root and “server_name.” Also, by doing this, you can add particular domain names.
Next, you must add the “document root locations” for both domains.
“listen 80;
root /var/www/html/example1.com;
index index.html;
server_name example1.com;
location / {
try_files $uri $uri/ =404;
}
}
server {
listen 80;
root /var/www/html/example2.com;
index index.html;
server_name example2.com;
location / {
try_files $uri $uri/ =404;
}”
Step 5: Restarting The NGINX Server
In the fifth step, you must restart the “NGINX server” in order to confirm the new changes. To do this, you must enter the following command:
“$ sudo nginx -t”
“$ sudo systemctl restart nginx”
Now, open your browser and enter “example1.com” to check the index page.
Next, repeat the same testing for your “example2.com” website.
And that’s the wrap-up for configuring two virtual hosts on a single server using NGINX.
Conclusion
So, now you know how to host multiple websites on one server. Whether you are a WordPress user, or Apache or NGINX web server user, we tried our best to make the steps as simple as possible. We hope this guide was able to help you in hosting your multiple websites on one server.
To get the best hosting and domain service, you can request a quote from ZoneWebsites.