Many of us use different browsers on a day-to-day basis to visit ours or someone else’s website. Chrome, as we know, is the most common browser people use to solve their queries or visit others’ websites. Most of the time, browsing is fun, and you can access your website. However, a regular user of Chrome may have encountered the DNS_PROBE_FINISHED_NXDOMAIN at least once.
Now, what is the meaning of the DNS_PROBE_FINISHED_NXDOMAIN error? And why is this error showing up on your browser? Most chrome users and other browser users have faced this error even when connected to a stable internet connection.
For non-Chrome users, you might be familiar with this “This site can’t be reached – Server IP address could not be found.” Well, whatever your case is, you should not worry about it, as this error is easily fixable.
So, we have some simple steps for you by which you can solve the DNS_PROBE_FINISHED_NXDOMAIN error in under five minutes. If the first one doesn’t work for you, you can try the other eight. We have mentioned in total nine ways by which you can fix this error on your browser whether you’re using windows, macOS, or your mobile phone.
However, before we give you the fix for the DNS_PROBE_FINISHED_NXDOMAIN error, let’s understand what this error actually means and what causes it.
Understanding DNS_PROBE_FINISHED_NXDOMAIN Meaning
DNS_PROBE_FINISHED_NXDOMAIN is a browser error that occurs when there is some issue with your Domain Name System (DNS). In most cases, it is because the DNS fails to resolve the website’s URL and fails to turn it into the IP address. This ultimately results in the browser being unable to reach your website.
If your browser displays the error code with NXDOMAIN, it means your domain doesn’t exist. Now, the domain is non-existent for your browser only, but in reality, it does exist. It is just the problem with your DNS which is making you face this error.
- Error code: DNS_PROBE_FINISHED_NXDOMAIN
- Error Type: DNS ERROR
- Variations in Error: For Google – “This site can’t be reached.”
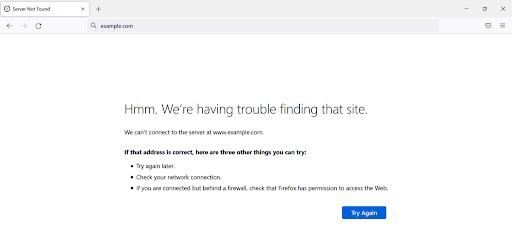
For Firefox – “Hmm. We’re having trouble finding that site.”
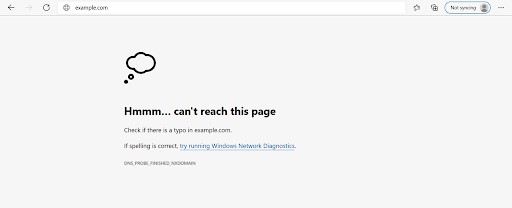
For Microsoft Edge – “Hmm… can’t reach this page.”
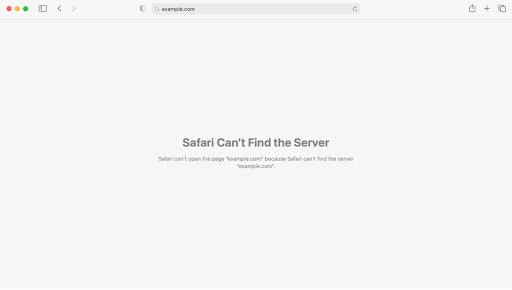
For Safari – “Safari Can’t Find the Server”
What Causes The DNS_PROBE_FINISHED_NXDOMAIN Error?
So, now you know what this error actually means and what different browsers show when facing this error. By knowing that, the next thing we should be learning about is the causes of DNS_PROBE_FINISHED_NXDOMAIN.
Now, an error such as this can happen for a variety of reasons:
- Your domain is expired or not registered, which results in browsers failing to locate it.
- You might be facing some internet issues which are causing this error.
- The VPN and antivirus are running in the background, causing problems with network settings.
- There is a problem with DNS settings, or they aren’t configured correctly.
- The system firewall blocking access to your website.
- You mistyped the name of your website.
For Google Chrome users, the DNS_PROBE_FINISHED_NXDOMAIN error will look like this:

As you can see, Google chrome highlights this error by saying, “This site can’t be reached.” This can differ for people who’re using other browsers. But don’t worry, as we will mention how the DNS_PROBE_FINISHED_NXDOMAIN error looks in different browsers once we reach the end of this post.
So, now that we know what this error looks like and what causes it, it’s finally time to understand how we can fix it.
Nine Ways For How To Fix DNS_PROBE_FINISHED_NXDOMAIN (For Windows, Google Chrome, and macOS users)
As we mentioned in the causes, this error can occur for multiple reasons. It can happen due to some website issues, system problems, poor internet connection, etc. So, whatever causes the DNS_PROBE_FINISHED_NXDOMAIN error, your right solution will depend on that only.
Without wasting time, let’s go through these nine ways by which you can fix the DNS_PROBE_FINISHED_NXDOMAIN error on Chrome while using Windows and macOS.
1. Clear the DNS Cache
If you’re facing the DNS_PROBE_FINISHED_NXDOMAIN error, the best solution for fixing this error will be clearing the DNA cache.
You may ask what the role of the DNS cache in this error is. Actually, this cache stores all the websites’ IP addresses that you’ve visited till now using the same system. Often, the IP addresses stored in the DNS cache become outdated. This makes it difficult for the system to locate the correct website.
However, don’t worry, as you can quickly clear the DNS cache for Chrome, macOS, and windows, by following the steps below.
For Windows
Stick with the following steps in order to clear the DNS cache in Windows.
- Firstly, head to the “Start” menu on your computer.
- Next, in the search bar, type “Command Prompt.”

- After that, use your mouse, right-click, and choose the “Run as administrator” option. You can also drag your mouse on the right side to click the same option.
- Then, type the “ipconfig /flushdns” command in the new window.
- Now, press the “Enter” key on your keyboard.

- Finally, head to your browser and search again and see if the DNS_PROBE_FINISHED_NXDOMAIN message is still there.
For macOS
- Firstly, start the “Terminal” app.
- Next, enter the “sudo dscacheutil -flushcache; sudo killall -HUP mDNSResponder” command.
- After that, hit the “Return” key on your keyboard.
- Then, enter the password and hit “Return” again.

- Finally, open your browser and see if the error still exists.
For Google Chrome
The popular browser Google Chrome has its own DNS cache. There are chances for you to fix the DNS_PROBE_FINISHED_NXDOMAIN issue if you clear its cache.
- Firstly, open the chrome browser on your computer.
- Next, in the search bar, type “chrome://net-internals/#dns.”
- After that, hit the “Clear host cache” button.
- Finally, browse your website and see if the error is resolved.
Read Also:- How To Change Domain In Zoho Mail: A Comprehensive Guide
2. Realizing and Renewing IP Address
Just like the previous method, the second method also revolves around clearing the cache. However, unlike the first one, which was base-level cache clearing, this method is more in-depth.
It assists with troubleshooting network connection problems by releazing the system’s old IP address and renewing it with a fresh one.
Here are all the steps you must consider taking for releazing and renewing the IP address on Mac and Windows.
For Windows
- Firstly, search for “Command Prompt” and click “Run as administrator.”
- Next, enter the “ipconfig /release,” and “ipconfig /renew” commands and hit enter between each of them.
- Then, enter the “netsh int ip set dns” and “netsh winsock reset” commands to reset your old IP settings and reinstate the Winsock Catalog.
- After that, stop the command prompt and head toward restarting your computer.
- Finally, head to your browser and see if it is free of the DNS_PROBE_FINISHED_NXDOMAIN error.

For macOS
You don’t have to open the command-line interface to renew and release an IP address in macOS. Here are the few steps you need to take:
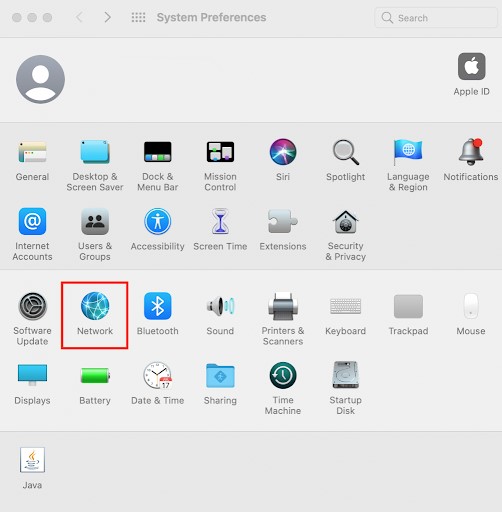
- Firstly, head to “System Preferences” in your system.
- Next, click on the “Network” option.
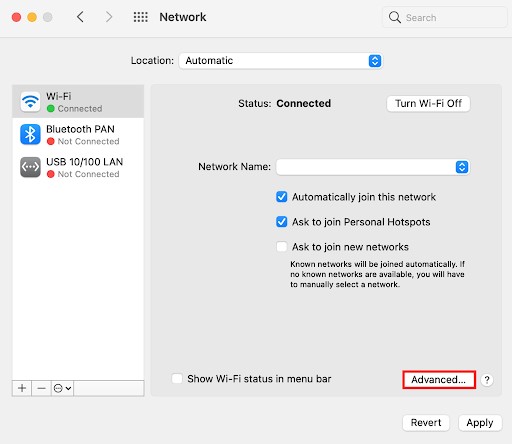
- Then, choose the network connection you’re currently using.
- After that, tap on the “Advanced…” button.
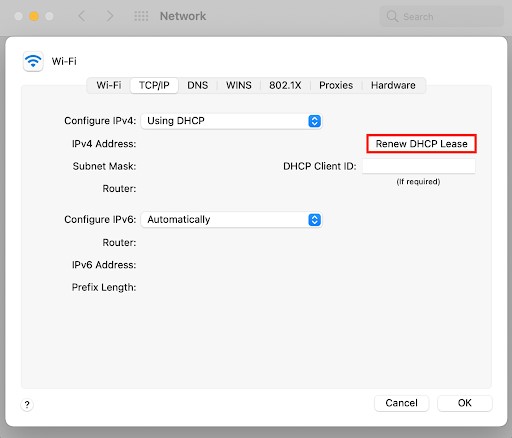
- Now, locate the “TCP/IP” tab.
- And from there, tap on the “Renew DHCP” Lease button.
- Then, finish the process by hitting the “OK” button.
- Finally, restart your computer and see if the error still exists.
3. Fixing By Changing The DNS Servers
If flushing the cache doesn’t solve your problem, it is recommended that you consider changing the DNS servers. These servers work by converting the name of the domain into its network address.
In typical cases, your system will have the DNS server addresses given by the internet service provider. But, usually, they are not highly secure or fast.
Because of low speed and security issues, many individuals prefer using public DNS servers from Cloudflare, Google, and OpenDNS. Furthermore, these servers are known to have lower technical problems.
In a few cases, you can resolve the problems with the internet connection by switching between different DNS servers.
For Windows
Follow these steps to change DNS server addresses if you’re on Windows:
- Firstly, head to the “Control Panel” section.
- Next, click on the “Network and Internet” tab.
- And from there, select the “Network and Sharing Center” option.
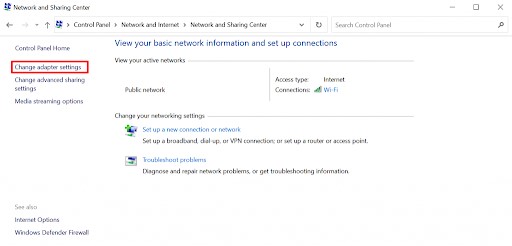
- Then, tap the “Change adapter settings” option from your window tab on the left side.
- After that, right-click on your current connection and select “Properties.”

- Now, either press “Internet Protocol Version 4 (TCP/IPv4)” or “Internet Protocol Version 6 (TCP/IPv6)” and continue by hitting the “Properties” button below.

- Next, drag your mouse to the window bottom, and tap on the “Use the following DNS server addresses” option.
- Then, type 8.8.8.8 in the “Preferred DNS Server” and 8.8.4.4 in the “Alternate DNS Server.”
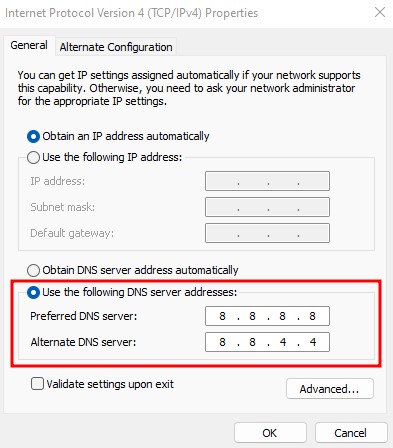
- Finally, press the “OK” button to save your recent changes.
- Get your browser started to see if this method resolves the DNS_PROBE_FINISHED_NXDOMAIN issue.
For macOS
Follow these steps to change DNS server addresses in macOS:
- Firstly, start by opening “System Preferences.”
- Next, from there, head to the “Network” option.
- Then, select the present local area network.
- After that, click the “Advanced” button.
- Now, head to the “DNS” tab.
- From there, click the “+” icon and enter the new “IPv4” or “IPv6” DNS servers.
- Enter the new address one at a time.
- Finally, after entering the addresses, hit the “OK” button.

- Start your Chrome browser on macOS to check if the error is gone.
For Google Chrome
Follow these steps to change DNS server addresses on Google Chrome:
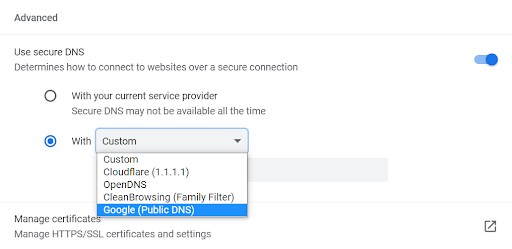
- First, type “chrome://settings/security” in the search bar of Chrome.
- Next, you will land on the “Chrome DNS settings” page.
- Then, come down to the “Advanced” section.
- After that, tap on the “With Customer” option.
- Finally, choose one of the DNS server addresses from Google, Cloudflare, CleanBrowsing, and OpenDNS.
4. Restarting DNS Client Service
For Windows users, there is another way to reconfigure DNS settings. You can do it by restarting the DNS client service.
Usually, DNS client service runs the moment you start your system. However, if it doesn’t function normally, your browser will fail to connect with any website since the DNS will prevent it.
You can use three methods to restart the DNS client services on your Windows computer: Windows System Configuration, Command Prompt, and Windows Services Manager.
Restarting DNS using Windows System Configuration
You can follow these steps to restart the DNS client service using this method:
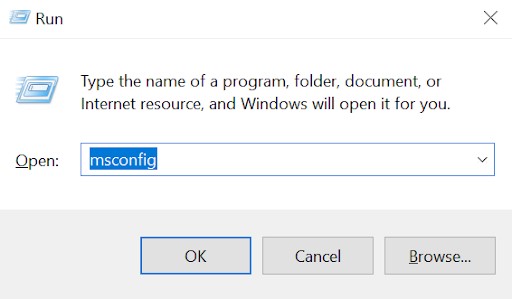
- Firstly, hold the “Windows + R” keys on your keyboard.
- Next, type “msconfig” when the search bar appears on the screen.
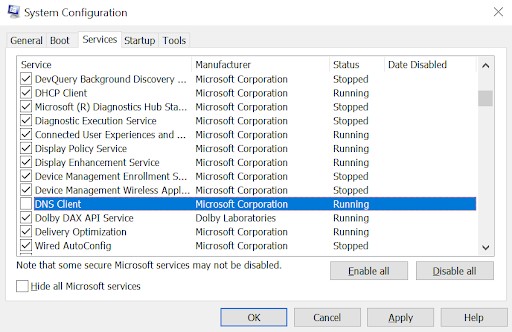
- Then, tap on the “Services” tab.
- After that, scroll down using your mouse and find the “DNS Client” option.
- Now, uncheck the “DNS Client” box and tap “OK.”
- Next, restart your system.
- You need to repeat the first two steps. However, enable the “DNS Client” this time.
- Finally, restart your computer again and see if the browser error still exists.
Restarting DNS using Windows Services Manager
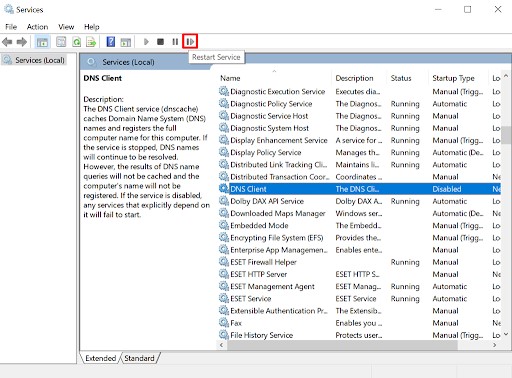
- Firstly, start the “Services” app.
- Next, keep scrolling till you locate “DNS Client.”
- Then, tap the “Restart Service” button, which you will find below the menu bar.
- After that, relaunch your system.
Restarting DNS using Windows Command Prompt
- Firstly, start the “Command Prompt.”
- Next, to stop the DNS service, enter the “net stop dnscache” command.
- Then, let it run and wait for “The DNS Client service is stopping” and “The DNS Client service was stopped successfully” to appear.
- After that, activate the DNS service once again by entering “net start dnscache.”
- Wait for the command to run and see the outputs “The DNS Client service is starting” and “The DNS Client service was started successfully.”
- Finally, restart your system.
There are a few Windows versions where this method might not come into action. A message will appear: “The requested pause, continue, or stop is not valid for this service.”
In case this happens to you, you should try previous methods for fixing the DNS_PROBE_FINISHED_NXDOMAIN error. Or, you should continue reading this guide to try other solutions for this error.
5. Examining The Local Hosts File
The role of the local hosts file is to assist in matching the name of the domain to its website or IP address. The system you’re using, whether it’s Windows or macOS, will refer to it whenever you try opening a website. Your system does this in order to land on the right page and show it on your browser.
There are a few cases when your local hosts file marks some particular IP address or domain names as unreachable. By examining the hosts files and editing them, there are chances you can solve the DNS_PROBE_FINISHED_NXDOMAIN error.
For Windows
You can follow these steps to examine your Windows hosts file:
- Firstly, head to your computer’s search box.
- Next, search for “Notepad,” right-click on it and tap the “Run as administrator” option.
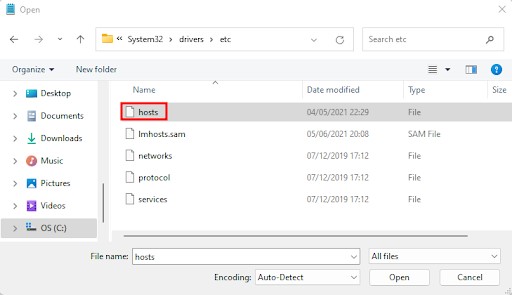
- Then, head to the “File” section and select the “Open” option.
- After that, switch the file filter to “All Files” from “Text Documents (*.txt).”
- Now, type “C:\Windows\System32\drivers\etc\” in front of the “File name” section.

- Next, head to the “hosts” file and click to open it.
- You will now see all the blacklisted websites with a “#” symbol.
- See if the website you’re trying to open has its IP address and domain name below the “::1 localhost” line.
- If yes, you must remove them and save the new changes later.
- Finally, visit your website and see if the error DNS_PROBE_FINISHED_NXDOMAIN still exists.
For macOS
Stick with these steps to edit the hosts file on macOS:
- Firstly, start the “Terminal” app.
- Next, type the “sudo nano /private/etc/hosts” command and enter your password.
- Then, the system will redirect you to your mac “hosts” file.
- After that, delete the websites “208.65.153.238 (youtube.com)” and “69.63.176.13 (facebook.com).”
- Now, delete all the inaccessible information on the site.
- You need to hit “Command + O” to facilitate the hosts file overwrite.
- Then, press the “Return” key to confirm all the new changes.
- Finally, hold “Command + X” to exit the hosts file page.
- Open your website to check if the error is still there.
6. Reset Chrome Browser Flags
Regular Chrome browser users might know about Google Chrome Flags which are part of the experimental features of the browser. So, these features don’t play any role in offering you the default browsing experience. However, you can use them as they are available for a free trial.
Few of these experimental features are known to have misconfigurations. You might face the “DNS_PROBE_FINISHED_NXDOMAIN” error while using these free features.
Follow these steps to disable Chrome Flags:
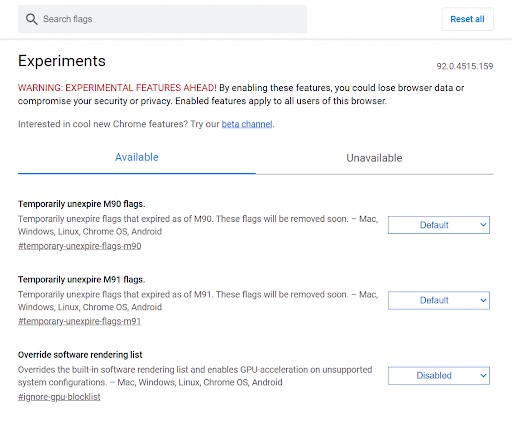
- Firstly, you must type “chrome://flags” in your Chrome address bar.
- Next, you will see the display of all the trial features which are running on your application.
- Then, switch to “Disabled” Chrom flags from the “Enabled” Chrome Flags.
- Or, press the “Reset all” button which you’ll find at the top of the browser.
- After that, your Chrome browser will come back to its default settings.
- Finally, close your browser and reopen it to see if the error is still there.
7. Turn Off VPN And Antivirus
Undoubtedly, many individuals use VPN software and antivirus programs for safe browsing. However, the safety tools you’re using can block a few of the websites you visit sometimes. Now, this domain address block can happen even if the websites you’re visiting are entirely safe.
In order to fix the DNS_PROBE_FINISHED_NXDOMAIN error, you should check if these safety programs you’re using are actually causing the problem.
Disabling your system’s antivirus program will depend on what type of program you’re using. So, if you’re unaware of how to disable it, you can contact the program support team or read some online instructions.
For Windows
In order to disable your VPN connection, consider following these steps:
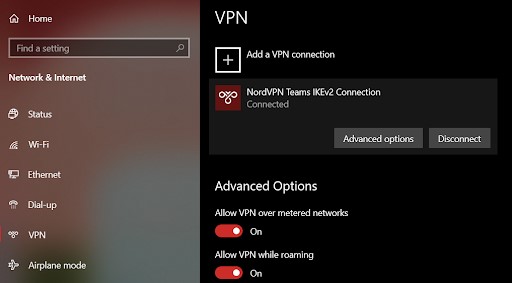
- Firstly, search for the “Settings” application in your system.
- Next, head to the “Network & Internet” section and look for “VPN.”
- Then, tap on the VPN service you’re currently using and hit the “Disconnect” button.
- After that, you must restart your system to finalize the process.
- Finally, head to the website you want to visit and check if it still shows the error.
For macOS
Disable VPN in your macOS by following the steps:
- Firstly, head to the “System Preferences” app.
- Next, tap on the “Network” section.
- Then, from your screen’s left side, choose the VPN connection you need to disable.
- After that, tap on the “Disconnect” button.
- Finally, press the “Apply” button from the bottom screen to activate changes.
- Visit the site and see if the error still exists.
8. Try Disabling Your CDN Temporarily
Sometimes the DNS_PROBE_FINISHED_NXDOMAIN error occurs from your site only. However, you might fix this error by turning off CDN (Content Delivery Network).
The feature is quite helpful in distributing fast web content to website visitors. It works by caching the various versions of your site on numerous global servers. Wherever a user clicks on your website, the CDN will assist in delivering cached content to the visitors using the closest server around them.
If you decide to turn off the CDN temporarily, you’ll be able to disable the website’s cached versions. Due to this, all the browsers out there will use your site’s origin server to fetch the website.
In case you’re unable to access your website without CDN, there are high chances you have outdated cached content. And because of this, it might be best to check your DNS settings, as it may be the cause of the error.
For individuals whose site directs them to the nameservers of Cloudflare, head to its dashboard and tap “Pause Cloudflare on Site.” You’ll find the button by scrolling down.

9. Restart Your Computer And Internet Connection
So, we are finally at the last method to solve the DNS_PROBE_FINISHED_NXDOMAIN error. This restart system and internet connection method are mentioned last because we know the pain you need to go through by using this one. Everyone has some open files on their system browser, and the internet, as we know, is a need for almost everything you do.
Restarting your system will require you to open those files again, and we know most of us are not fans of it. However, if the above methods don’t work for you, then this will be the only method you can go for.
But wait, before you restart your computer, you can try fixing the DNS_PROBE_FINISHED_NXDOMAIN error by restarting your internet modem and router. Now, how will you perform it? Follow these steps:
Step 1: Start by unplugging the router and modem. Let them stay disconnected for at least 30 seconds.
Step 2: Now, connect the modem back, and let it stay like that for one minute.
Step 3: Repeat the same for your router, and let it stay like that for two minutes. After that, turn the router back on.
Step 4: Finally, go back to the website and see if the error still exists.
Are you still facing the error? Try contacting your internet provider. It might be a problem from their side, and they can help you solve your issue.
DNS_PROBE_FINISHED_NXDOMAIN Android And iOS (Ways To Fix IT)
So, now you know how you can solve the DNS_PROBE_FINISHED_NXDOMAIN error if you’re using Chrome on Windows and macOS. However, what if the error is not showing on your computer device? Instead, what if you’re facing the same error on your Android and iOS devices?
If that is your case, worry not, as we have the perfect methods by which you can solve this DNS error on your Android and iOS devices.
1. Try Restarting Your Mobile, iPad, Etc.
Yes, we know, this is the most obvious advice you can get from someone whenever something doesn’t work on your phone. And this is also one of the most famous lines of those tech support guys “Have you tried restarting your device?”
However, in reality, restarting your iOS and Android device does work and help you solve the issues. So, before we look into a more complicated method to fix the DNS_PROBE_FINISHED_NXDOMAIN error, let’s try using an easy approach.
For Android
Follow these steps to fix the DNS error by restarting your Android device:
- Firstly, hold down the power key of your mobile phone.
- After that, you will get a menu with multiple options.
- From there, click on the “Restart” button.
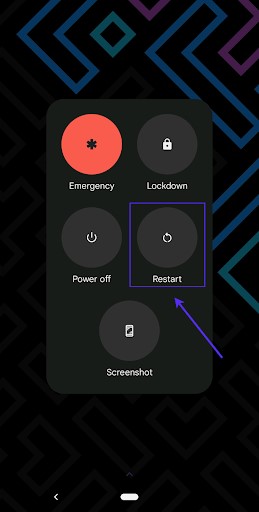
- Finally, head to Chrome once the device starts functioning again and check if the error is gone.
For iOS/iPhone
Consider the steps to fix the DNS error by restarting your iOS device:
- Firstly, hold down the power and volume up/down buttons of your iOS device.
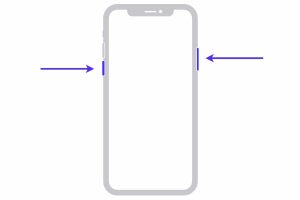
- Next, keep holding those buttons down until a slider appears to turn off the device on your mobile screen.
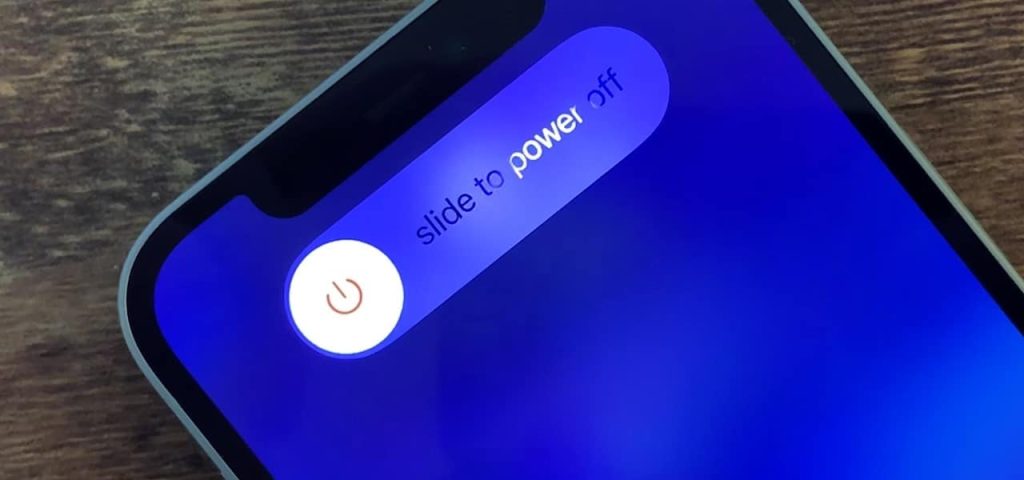
- After that, drag the power slider to the right and wait to let it turn off.
- Then, press and hold your iOS device’s power button to turn it on.
- Finally, visit your browser and check if the error is gone.
2. Look For The Browser Updates
Sometimes when your browser is not updated, you can face the DNS_PROBE_FINISHED_NXDOMAIN error. So, our second method to solve this error on your Android and iOS devices revolves around updating the browser.
If you’re using Chrome or any other browser, you can follow these steps to solve the error on your mobile devices:
- Firstly, open your device “Google Play Store” (for Android users) or “App Store” (for iOS or iPhone users).
- Next, click on the profile icon, which you’ll find at the top right of the search bar.
- Then, press the “Manage apps and device” option.
- After that, hit the “Updates available” tab.
- Now, find your browser from the list, and click on the “Update” icon next to it.
- Finally, once the update is over head to your browser and see the error again.
Are you still facing the DNS error? Maybe, the next step will work for you.
3. Clear Your Application And Browser Data
For sure, caches are highly helpful for anyone who wants a fast browsing experience. However, sometimes the cached data stored in your browser and its application can cause the DNS_PROBE_FINISHED_NXDOMAIN error.
But clearing cached data is completely safe and may help you fix this error.
Follow these steps to clear your browser and app cache on your mobile devices:
- Firstly, click on the browser app on your Android and iOS device.
- Next, click on the icon (⋮ or ⋯), which will be either at the bottom or top.
- Then, click on the “History” option and, from there, head to “Clear browsing data.”
- After that, check “Cached image and files” and “Browsing history.” Don’t check the other options.
- Now, if you see a message like “Also clear data from these sites?” tap on the “Clear” button.
- Wait for some time to let Chrome finish clearing the browser data.
- Finally, click the “Ok, got it” message to complete the process.
Visit the website and see if it’s error-free. If the error still exists, move to the next step.
4. Look For The System Updates
Most of the time, we have a system update on our phones without realizing it. It is essential you’re running your phone on the latest system update as it can sometimes cause the DNS_PROBE_FINISHED_NXDOMAIN error.
For Android
Follow the steps to run your Android device on the latest system update:
- Firstly, head to your Phone “Settings.”
- From there, click on the “System” option and then “System Update.”
- Next, your mobile screen will show you’re up-to-date.
- Ignore that and click the “Check for update” option.
- After that, let the system check for OS updates.
- In case there is an update, click on the “install” button and the prompt steps.
- Finally, restart your device and check for the error.
For iOS/iPhone
Check for the system updates on your iOS device by following these steps:
- Firstly, head to the “Settings” application on your iPhone.
- Next, tap the “General” option, and from there, tap on “Software Update.”
- If you see an available update, click the “Download and install” option.
- After that, wait for the “Install Now” pop-up on your mobile screen.
- Then, restart your iPhone.
Now, go to your Chrome or any other browser, and see if the DNS_PROBE_FINISHED_NXDOMAIN error is still there. You can try the following method if this doesn’t work for you.
5. Try Changing The Phone’s Network Settings
If you remember, in our third method for fixing the DNS_PROBE_FINISHED_NXDOMAIN error in Windows and macOS, we discussed changing the DNS servers or settings. You can repeat the same process for your mobile devices.
For Android
If you want to change DNS settings on an Android device, ensure to follow these steps:
- Firstly, head to the “Setting” app on your mobile device.
- Next, navigate to “Network & Internet,” and from there, tap on the “Internet” button.
- Then, ensure Wi-Fi is toggled “On.”
- After that, press & hold the Wi-Fi net connection, and then click the “Modify” button.
- Now, navigate “DNS 1” and “DNS 2” under the “Advanced options.”
- Under DNS 1, type “8.8.8.8,” and under DNS 2, type “8.8.4.4.“

- Finally, hit “Save” at the bottom.
Now, head back to your chrome browser and check if the error still exists.
For iOS/iPhone
Want to change the DNS setting of an iOS device? Follow these steps:
-
- Firstly, head to the “Settings” app and click the “Wi-Fi” option.
- Next, hit the “network” icon in the menu.
- Then, click “Configure DNS” and then “Manual.”
- Delete all the existing listings, and add the following from top to bottom under the DNS Servers:
- 8.8.8.8
- 8.8.4.4
- 2001:4860:4860::8888
- 2001:4860:4860::8844
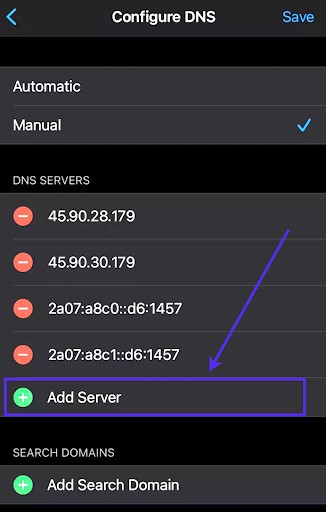
So, now refresh your browser and see if it’s working now.
How does DNS_PROBE_FINISHED_NXDOMAIN show up on other browsers besides Chrome?
So, until now, we have learned how to fix the DNS_PROBE_FINISHED_NXDOMAIN error in Windows, Android, macOS, iOS, and Google Chrome. However, there are other browsers besides Chrome that can show you the same error.
The message of this error can differ based on what browser you’re using to access the site. Let’s see how the DNS error message appears on various browsers.
Mozilla Firefox
When you use Mozilla for browsing, the message for the DNS error will say that it can’t connect to the server of the website. Furthermore, you will see suggestions like visiting the website later, checking the net connection, and checking the firewall.
Safari
When you browse through Safari, you will not see any unique error code on it. It will simply state that it cannot locate the server.
Microsoft Edge
Similar to Google Chrome, you will see the same error code “DNS_PROBE_FINISHED_NXDOMAIN” on Microsoft Edge.
Conclusion
As you can see, the DNS_PROBE_FINISHED_NXDOMAIN error can occur on your browser for various reasons. It can either happen due to server issues, the network connection, or the client’s browser.
With our nine working methods, you will be able to solve this DNS error in no time. Whether the error is on your computer or mobile phone, you can stick with our guide methods to find the right solution.
You should contact your internet provider if the DNS error still exists even after trying all the methods. If you’re the owner of the website, contact your domain registrar or hosting provider so they can assist you in fixing your problem.
