In this post, you will learn how to point the Namecheap domain to HostGator. If you have recently got a domain name via Namecheap, chances are you would like to host it on HostGator.
Well, you are certainly right on that part. When we talk about the web hosting industry, there is none other alike HostGator and Namecheap.
While Namecheap is known to provide quality, cheap domain names, HostGator is popular because of its affordable and convenient web hosting services.
So, let’s start with the guide for pointing the Namecheap domain to HostGator.
Step 1: Signing Up For The Web Hosting Services Of HostGator
Someone who already has the HostGator hosting may skip this part.
If you don’t have it yet, you need to buy web hosting to continue this process.
You can choose HostGator Shared Hosting if you are a small business with not a very big budget. It is an affordable as well as a convenient web hosting service.
With HostGator, you get three shared hosting plans which are Business, Baby, and Hatchling. Out of all these, the Baby plan is a crowd favorite as you can host unlimited sites with it.
After signing up for HostGator, it’s time that we move to our next step.
Step 2: Finding HostGator Nameservers
In this step, you are needed to get the nameservers from HostGator.
- Firstly, start with logging into the HostGator cPanel.
- In order to find the cPanel login, you need to visit “http://yourdomain.com/cpanel.”
- In case you can’t get through using that link, check your welcome email by HostGator. You will have all the login details in that mail.
- After successfully logging into the cPanel, navigate towards the “General Information” section, which you will find in the right bottom corner.
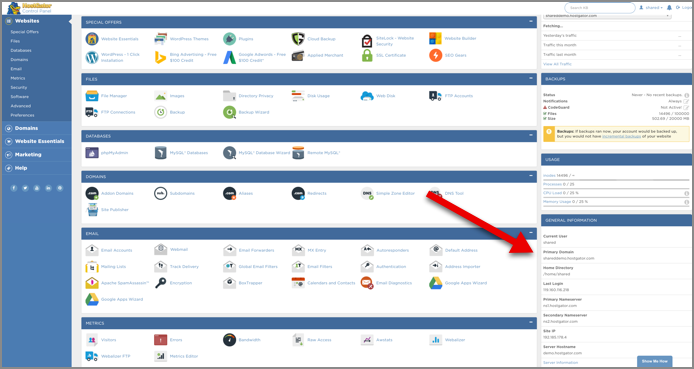
- When you click on it, you will see the secondary nameserver and primary nameserver there.
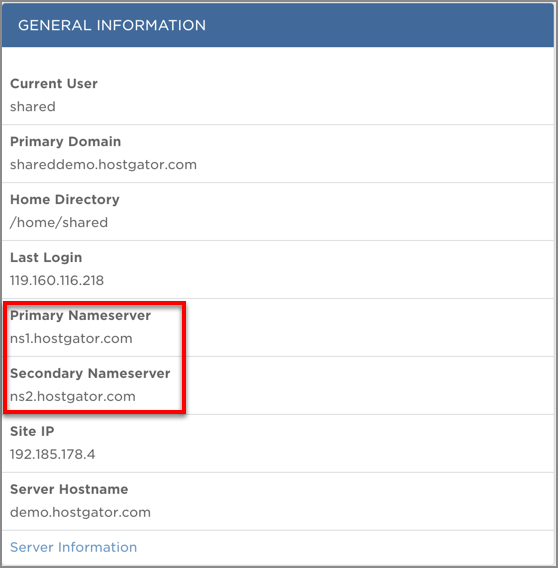
- Keep that tab on your screen in order to proceed to the next step.
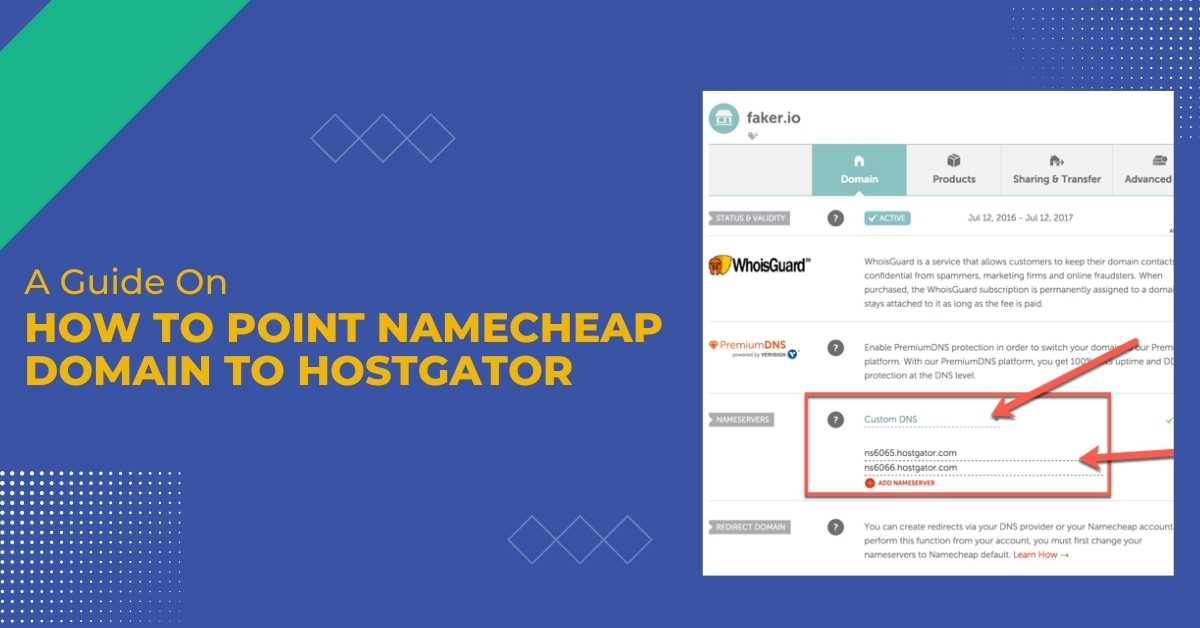
Step 3: Changing Nameservers On Namecheap [DNS]
In this step, you have to change the nameservers on Namecheap in order to connect the domain with HostGator.
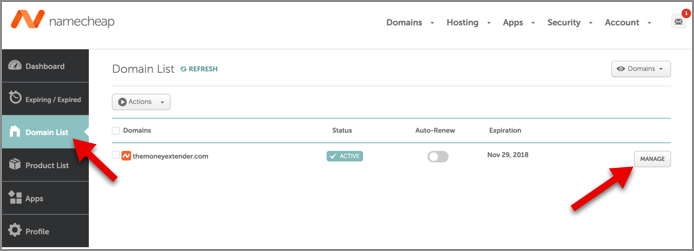
- Firstly, login into your Namecheap account.
- Now, head to the “Domain List” section.
- From there, tap on the “Manage” button.
- Now, come down to the “Nameservers” section.
- From there, click on the “Custom DNS” option.
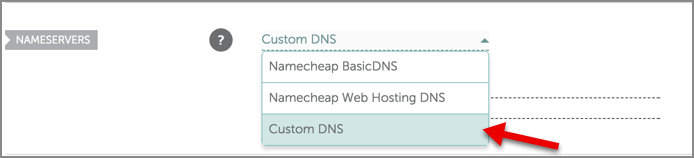
- Now, to proceed further, you are needed to fill out the secondary and primary nameservers of HostGator.
- After entering them, tap on the green color tick mark to save the changes.

With this, the Namecheap domain name server is pointed towards HostGator hosting. You have to wait for some time for the complete DNS update.
Read Also: How To Change Shopify Theme: A Comprehensive Guide
Step 4: Adding Namecheap Domain To HostGator
For this next step, you have to add the Namecheap domain to HostGator.
- Firstly, login into the HostGator cPanel.
- From there, tap on the “Addon Domain” option. You will find it in the “Popular Links” section.
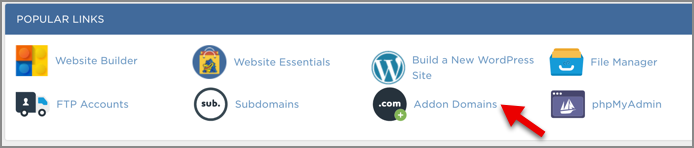
- After coming to the next page, you have to enter the domain name under the “New Domain Name” field.
- All the other fields will get automatically filled once you enter your domain name.
- After that, simply tap on the “Add Domain” button.

- You will receive a success notification after clicking on it.
Step 5: Installing A Platform
In this final step, you are needed to install a platform in order to make your website.
Many recommend using WordPress to do this process. It is considered to be the best CMS and one of the best blogging platforms. Furthermore, it is highly convenient to use.
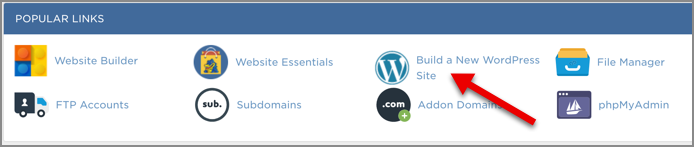
The best thing about HostGator is it provides 1 click WordPress Installation.
- Head towards the HostGator cPanel and tap on the “Build a New WordPress Site” button. You will find it in the “Popular Links” section.
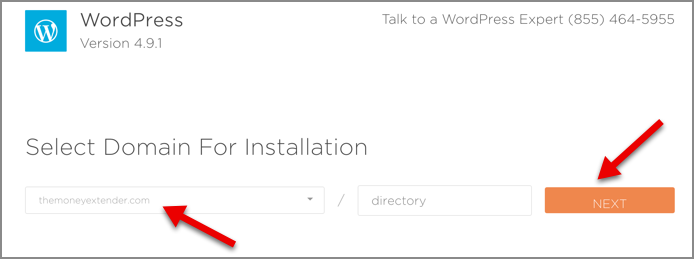
- When you are on the next page, choose the domain name where you like to install WordPress.
- After that, tap on the “Next” button.
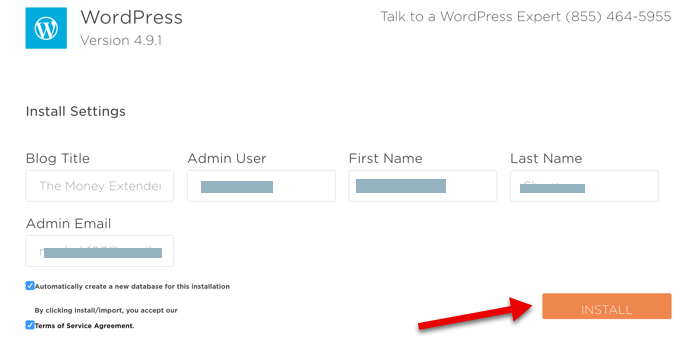
- Now enter the details related to Blog Title, Email, Name, and Username.
- After that, tap on the “Install” button.
With that, you complete the entire process of pointing the Namecheap domain to HostGator.
Conclusion
So, how to point the Namecheap domain to HostGator? We hope you now understand the steps you need to take to complete this process smoothly.
Pointing the Namecheap domain to HostGator is not a hard process. With a little bit of knowledge, anyone can do it.
If you are searching for the best affordable domain and hosting services, contact Zone Websites. We are a leading company with years of online marketing experience. We help organizations rank their business among a big crowd.
Furthermore, we offer digital marketing services, including services like logo creation, website development, email marketing, etc. In case you want to make your brand name and want organic growth, visit us today.
Please fill out our form, and our experts will get back to you for any related services you desire.
FAQs
How Do I Use My Namecheap Domain With HostGator?
If you want to connect the Namecheap domain and a HostGator account, you need to get a HostGator nameservers first.
After getting the Nameservers, follow these steps to use the Namecheap domain with HostGator:
- Firstly, sign in to the Namecheap account.
- Now, click on the “Domain List” present on the left side.
- Continue by clicking on the “Manage” icon right next to the domain name.
- Now, choose the “Custom DNS” from the drop-down option of “Nameservers.”
- After doing that, tap on the green checkmark to save the changes.
You may need to wait for 24-48 hours to let the changes take place.
How To Point The Domain To HostGator When Using DNS Elsewhere?
Follow these steps to point the domain to HostGator while using DNS:
- Firstly, Head to the Domain section to see the domain listed.
- After that, find the domain name from that particular section.
- Now, tap on the DNS button.
- Continue by scrolling down towards the Nameservers section.
- Now, tap on the “Change” button.
How To Connect The Namecheap Domain To cPanel?
Suppose your domain name is pointed towards the Nameservers hosting services. In that case, you can add it to the hosting account without any problem.
- Firstly, you need to login into the cPanel.
- After that, navigate towards the Domain section.
- From there, click on the Addon Domains menu.
- Now, fill out the asked details in the “Create an Addon Domain” section.
- Finally, tap on the “Add domain” button.
Is It Needed To Transfer The Domain To HostGator?
No, you are not needed to transfer the domain registration to HostGator. You can keep the domain name registered with some other organization and will still be able to use the hosting as well as SSL certificates.
How To Find The Nameservers On HostGator?
- Firstly, login into your HostGator account.
- Now tap on the Hosting option from the left menu.
- From the section of the Hosting Packages, find your current hosting package.
- After that, tap on the Manage link button.
- Now tap on the Settings tab.
- You will find your name servers under the section of Nameserver 1 and 2.