Searching for how to install WordPress on HostGator? It is not surprising as HostGator is known to be the fastest-growing and one of the most popular web hosting providers in the world. This post will help you solve all your concerns regarding how to install WordPress on HostGator through a step-by-step guide. If you are already a part of HostGator, you will surely understand that it’s an affordable and beginner-friendly web host with various features. The installation process of HostGator on WordPress is very simple. Let’s start with the steps involved with how to install WordPress on HostGator.
The first four steps will guide you on how to sign up with HostGator. If you are already done with the signup process, head straight to the section explaining installing WordPress.
Step 1: Visit The HostGator Website
Visit the website and scroll down to find the hosting plans page (it’s very easy to locate).
Step 2: Decide On The Web Hosting Plan As Per Your Requirements
HostGator consists of three web hosting plans that you are eligible to sign up for. The names for the plans are Hatchling, Baby, and Business. If you purchase web hosting plans for the first time, we recommend that you go with the Hatchling plan, as it is beginner-friendly and the most affordable.
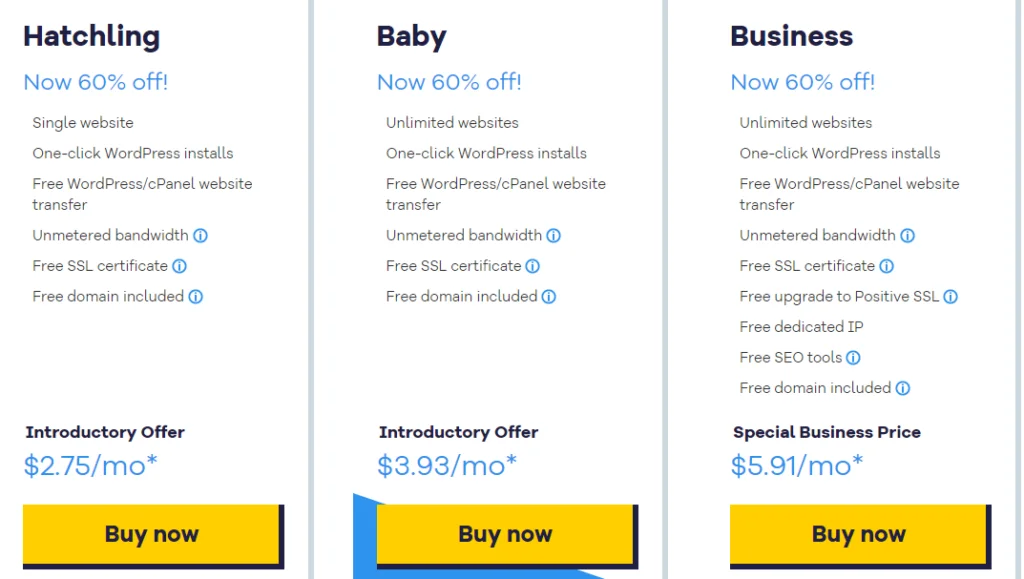
Each plan comes with amazing features and benefits, and the difference between them is as follows:
- The hatchling plan is qualified to host one website only.
- The baby plans cover everything the hatchling plan has; you can host unlimited websites.
- The business plan comes with everything Hatchling & Baby plan contains and offers a free Positive SSL certificate, an IP address, and helpful SEO tools.
Read Also: How To Edit Header In WordPress? A Step-By-Step Guide
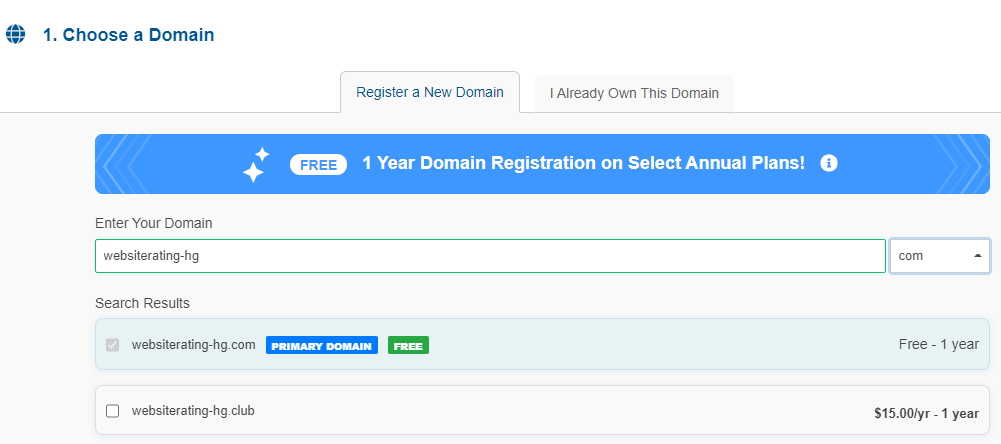
Step 3: Decide Domain Name
The next step after deciding on the hosting plan is to choose a domain name. To complete this step, you can go with registering a new domain, or you have the option of signing up with an existing domain you have.
Step 4: Sign Up On HostGator
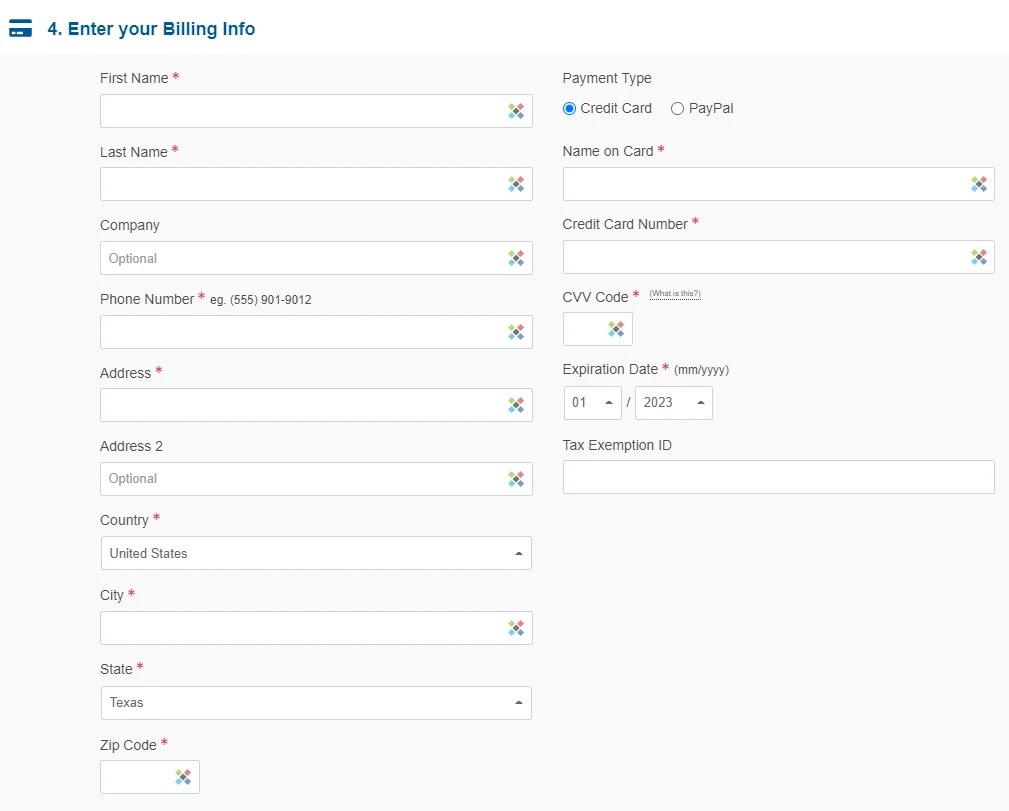
Decide on the type of hosting package and the billing cycle. After this, you will get asked to create the login of the HostGator account. Ensure that you fill all the required fields such as email address, password, and Security PIN.
As an active online user, you have done this process many times before, like filling in the first and last name, country address, phone number, and so on, followed by payment info like credit card or PayPal.
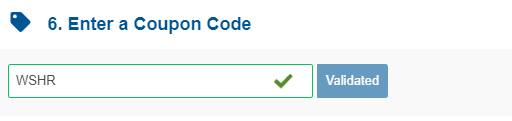
After this, go further and deselect all the additional services offered by HostGator, as they are not part of any concern. You can gain additional benefits from this process if you use a coupon code.
Lastly, check the details of your order and the total amount due. You have now successfully signed up with HostGator. With this, you will get a welcome email on the signup email address containing your login credentials for your HostGator Customer Portal.
Step 5: Installing WordPress
Start with login into your HostGator dashboard, and the link for this you can find in the welcome email.
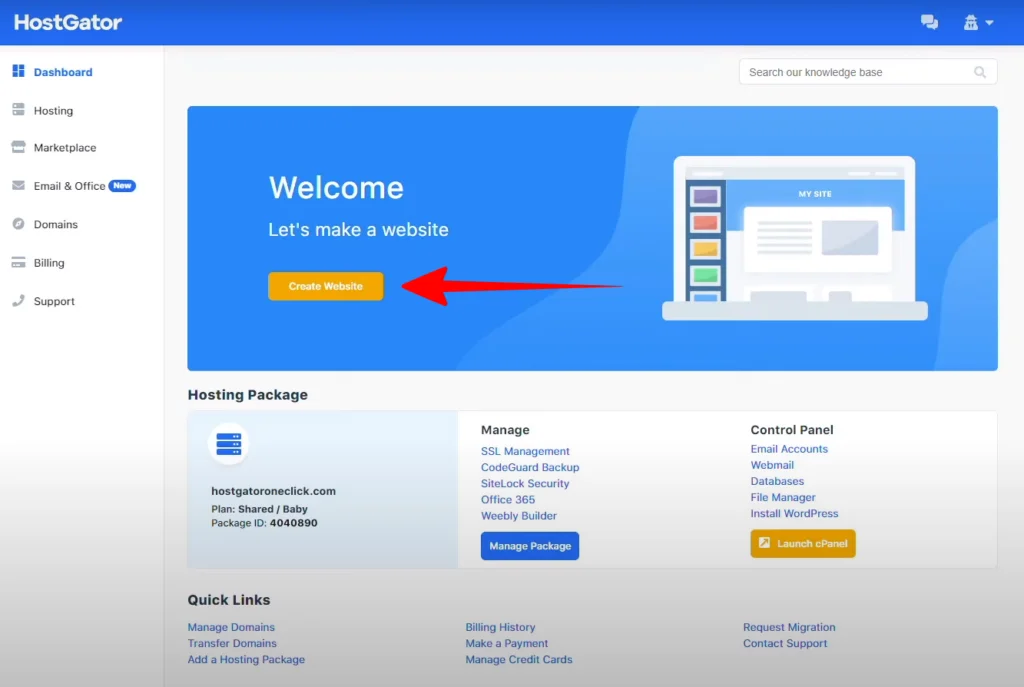
- Press the ‘Create Website’ button. You will get directed to the new page by pressing it, where it will install WordPress.
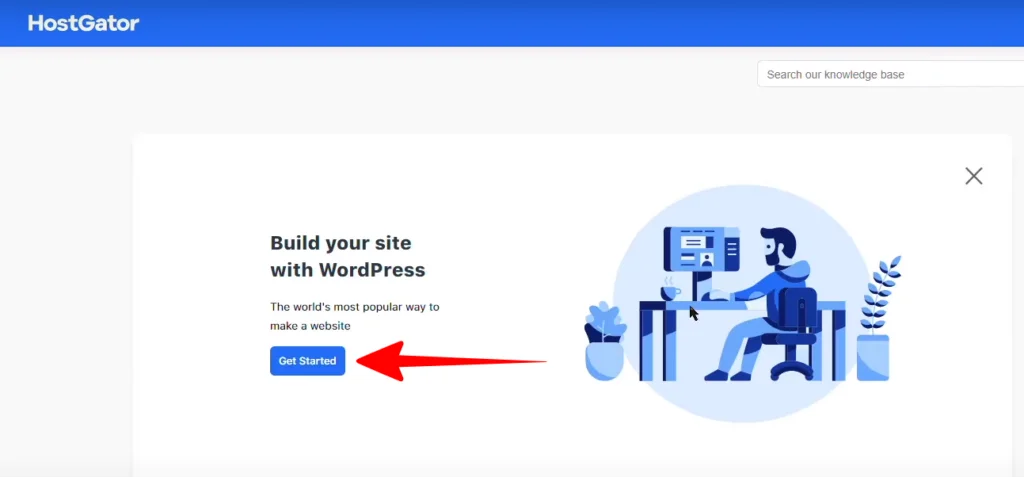
- Proceed by clicking the ‘Get Started’. You just have to wait for a few seconds while the WordPress installation process on your HostGator hosting plan continues.

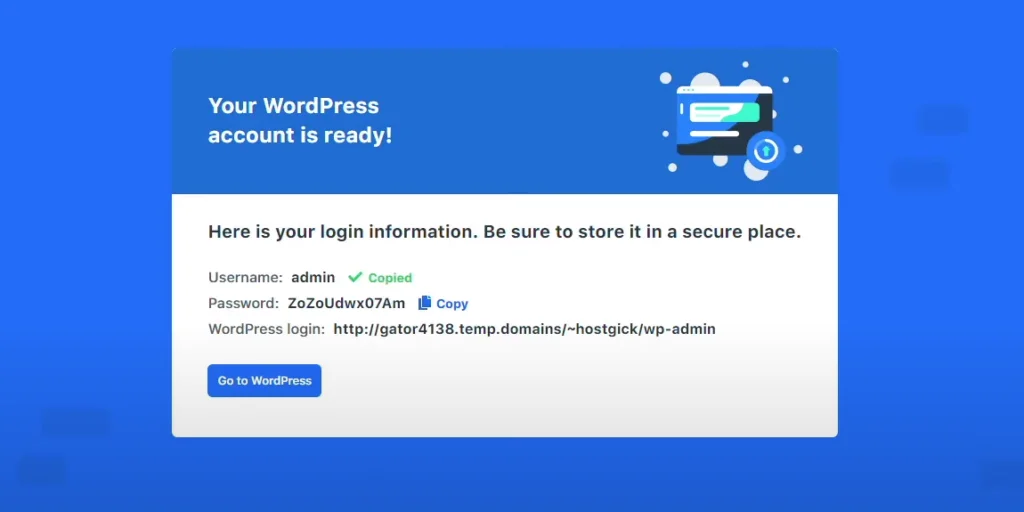
- With this, your WordPress account is ready and installed. It was as easy as we stated.
- Now, without any delay, copy your username as well as your password. You need this to continue with the login process.
- You will also find login to your WordPress dashboard. This URL is temporary (in the next step, we explain how to connect your domain name).
- Now press the ‘Go to WordPress’ button to get on your website.

With this, you are officially into the WordPress site dashboard and free to customize it.
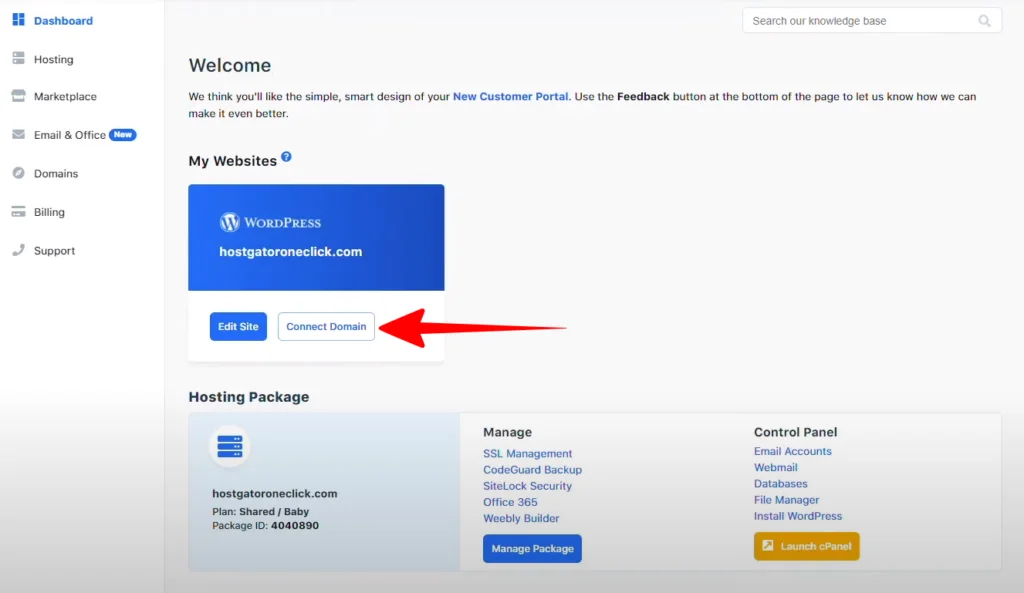
Step 6: Connect To Your Domain Name
The next step is to connect the domain name to the newly created website.
- Head back to the HostGator dashboard. When you enter the ‘My Websites’ section, simply press the ‘Connect Domain’ button.
- You will find a text mentioning that your domain is not connected to the website, and you will continue using the temporary URL until you decide to connect your website.
- To continue, Press the ‘Show Me How’ button to connect your domain.
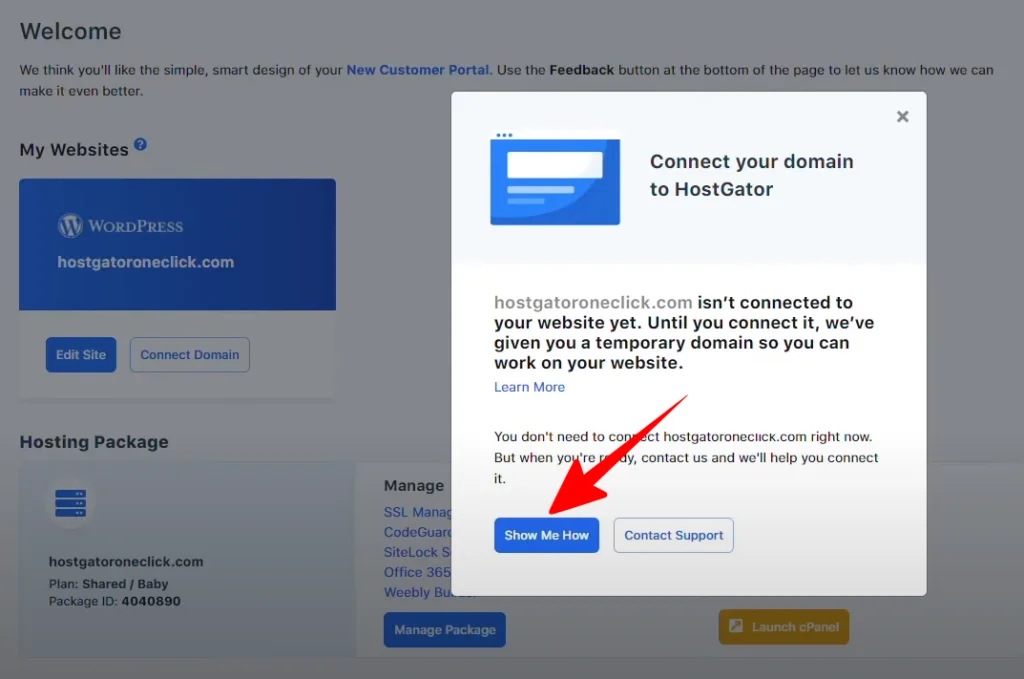
- You will find simple steps to guide you on connecting your domain name to your website.
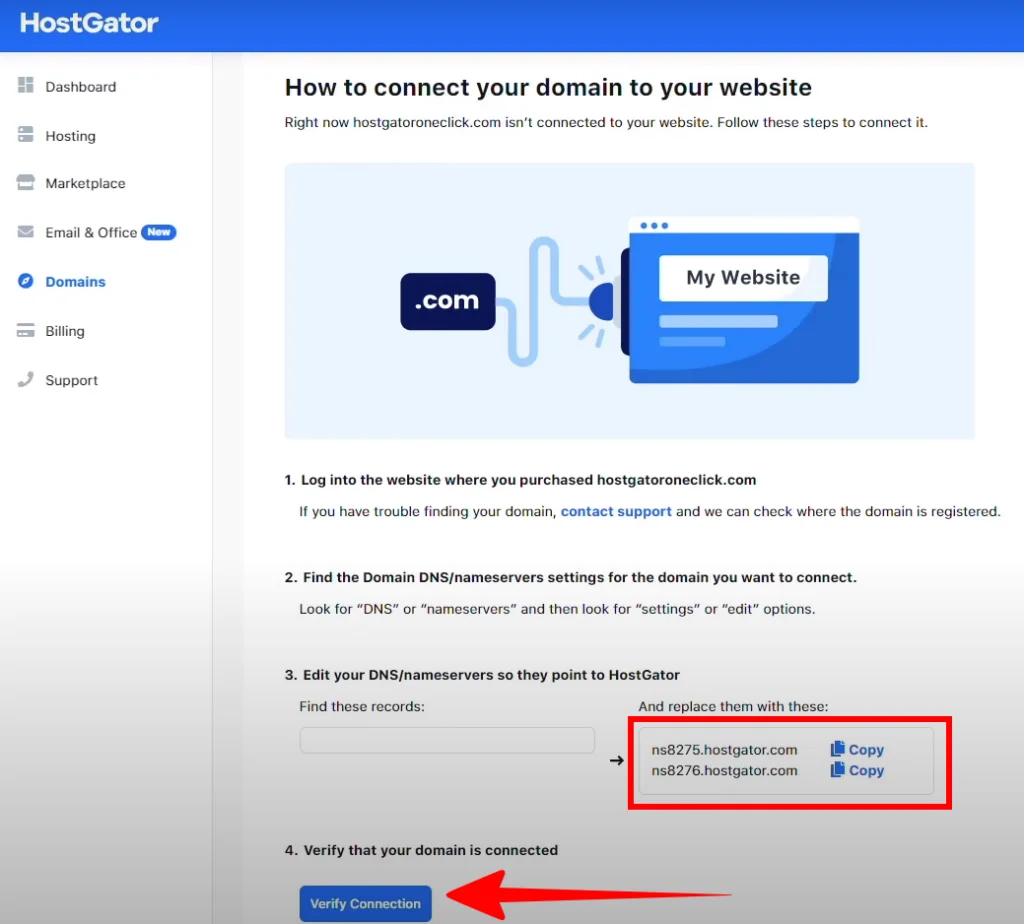
Here is the process on how to verify the domain name connection:
If you bought the domain name with the help of HostGator (HostGator is the registrar)
- HostGator will change the DNS for you without manual support after clicking the ‘Verify Connection’ button.
- This will be enough to receive an email in your inbox containing a verification link, which you are required to click for confirmation purposes.
If you bought the domain name from some other source (for example, if Zone Websites is your domain name registrar):
- You have to copy both the name server records (nsXXX1.hosygator – nsXXX2.hostgator.com)
- Get logged into the registrar (for example, Zone Websites) and continue with changing the DNS name server settings.
- After you are done with this, come back and press the ‘Verify Connection’ button. Give at least 24 to 48 hours to the DNS to complete the propagating process.
Final Words
And that was everything about how to install WordPress on HostGator manually. Rejoice as you have successfully installed WordPress and have connected your domain name. Don’t wait; start customizing your website and building your blogs today.
The domain and hosting of your website matter a lot, and Zone Websites understand its importance. We offer the most affordable website creation services and create logos that enhance the beauty of your website. Visit us to check our services and make a smart decision by taking our assistance.