Sezzle offers great convenience to the customer who prefers the “buy now, pay later” method. If you own an e-commerce website, then you are surely looking for how to add Sezzle to Shopify. Every company is aware of how much customers love using Sezzle services.
To understand all the steps involved in how to add Sezzle to Shopify, keep reading this guide. We will cover everything that will help you maximize your business.
Steps On How To Add Sezzle To Shopify
Here are the steps you need to follow in order to add Sezzle to Shopify.
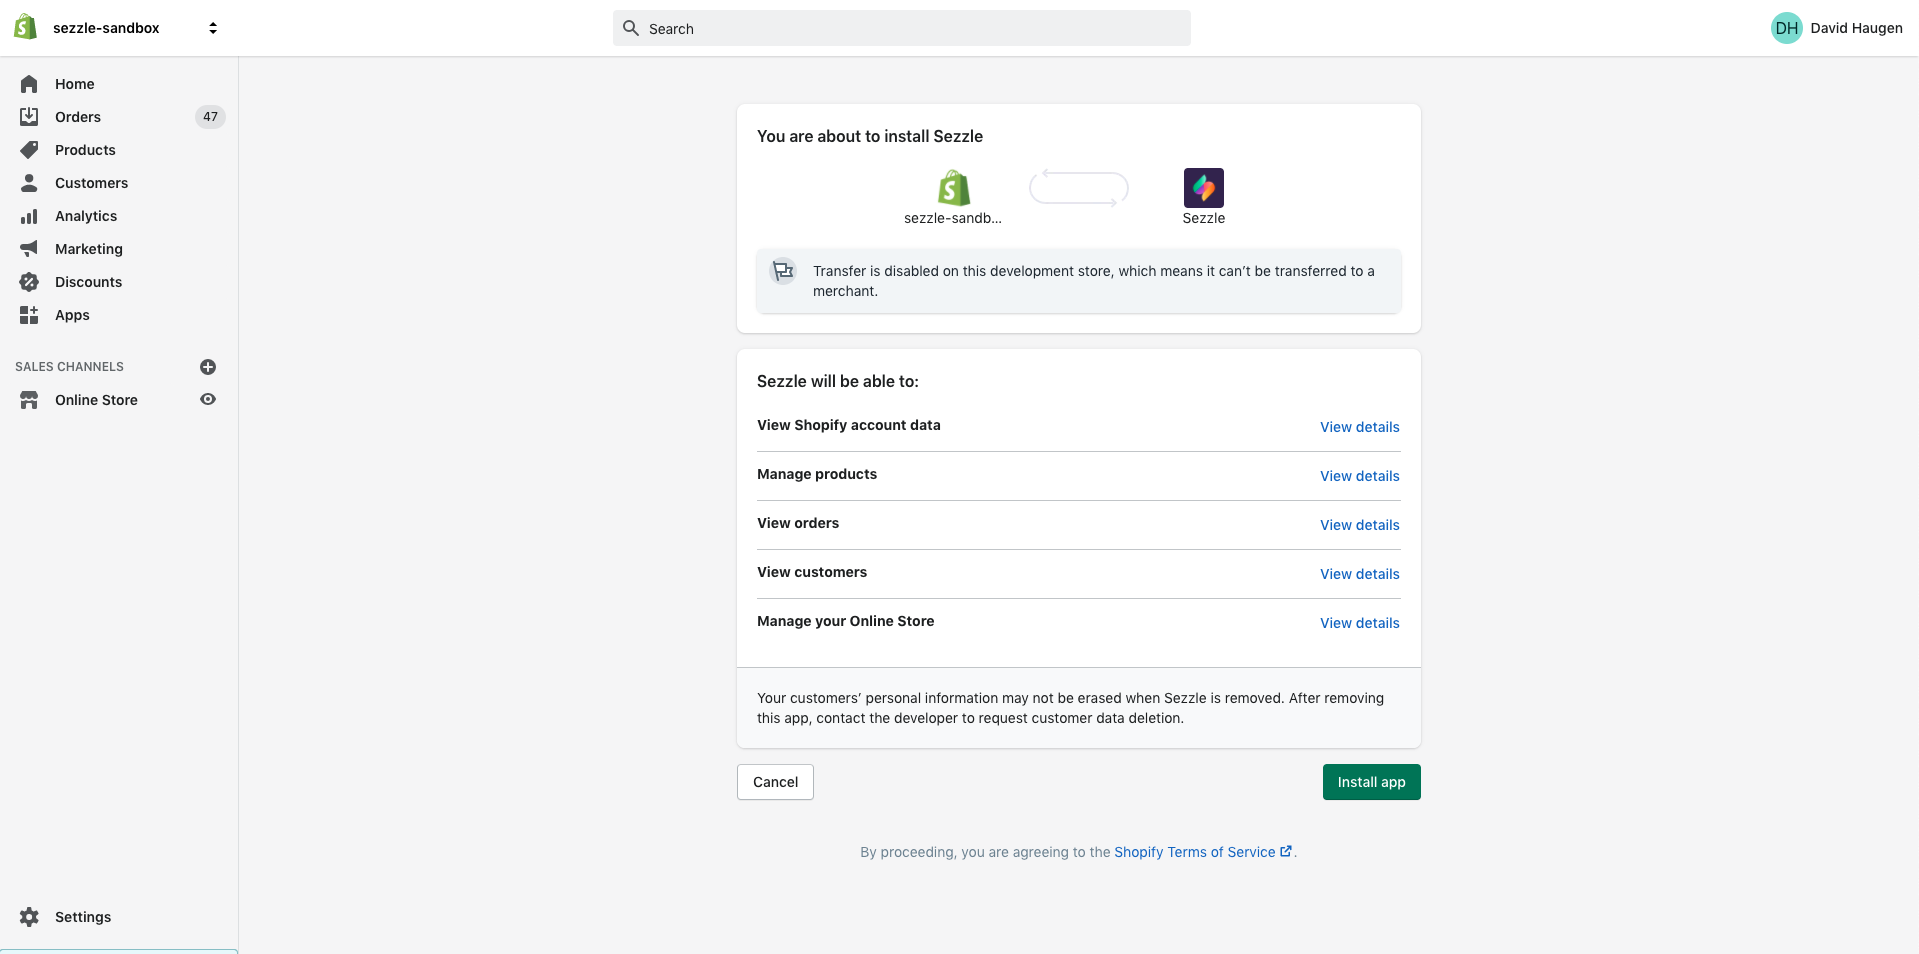
Step 1: Start By Installing Sezzle Payments
Follow these steps to install Sezzle payments-
- Upon installation, you need to add the production “Sezzle public and private API keys.”
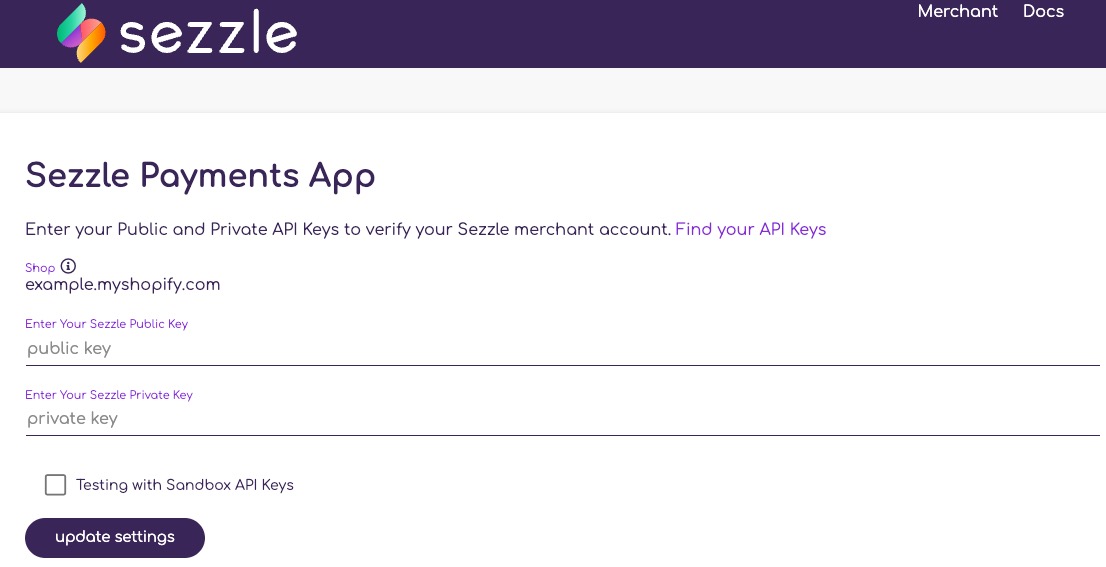
- Now press the “update settings” option in order to verify the Sezzle account.
- From there, you will get redirected towards the page of payment settings, and from there, you are required to activate the “Sezzle Payments” for the store.
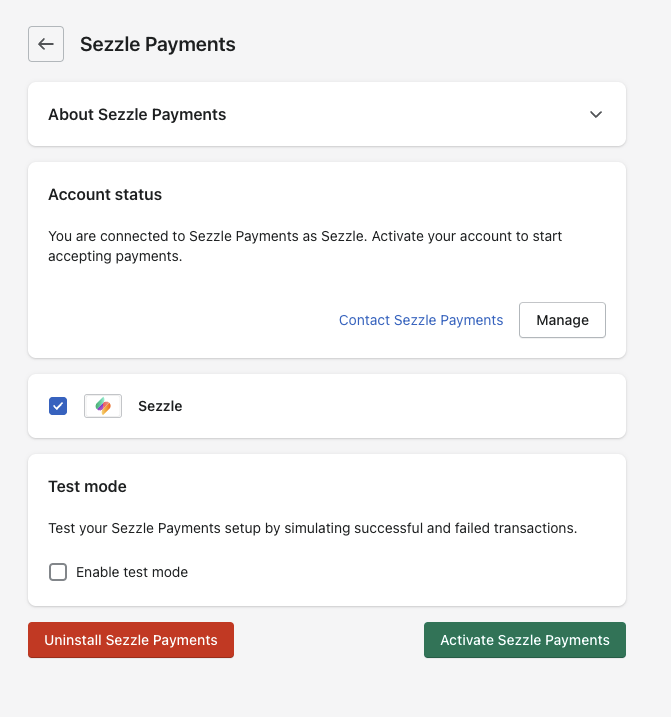
- Now press on the “Activate Sezzle Payments” icon.
- With this step, you will be able to see Sezzle activated as the payment method for the store.
Step 2: Time To Add Widgets
Go through the steps mentioned below to add widgets-
- After completing the previous process, you are able to access the free plugin for the Shopify app that helps in adding widgets to the product pages. You need to do this so that the customers can know that you also offer the Sezzle payment option. To perform this step, you need to choose the option available under the “Download Shopify App Plugin”. You will find it in the “Setup Checklist.”
- Once the app installation is over, you need to enter the “Public API Key” in the Sezzle app, and you can find it here. After that, you need to press the “Link Sezzle account” icon.

- When the procedure of linking your account gets over, press the “Add Widgets” option. You need to do it in order to add widgets to the product pages. The entire process lasts for around two minutes.
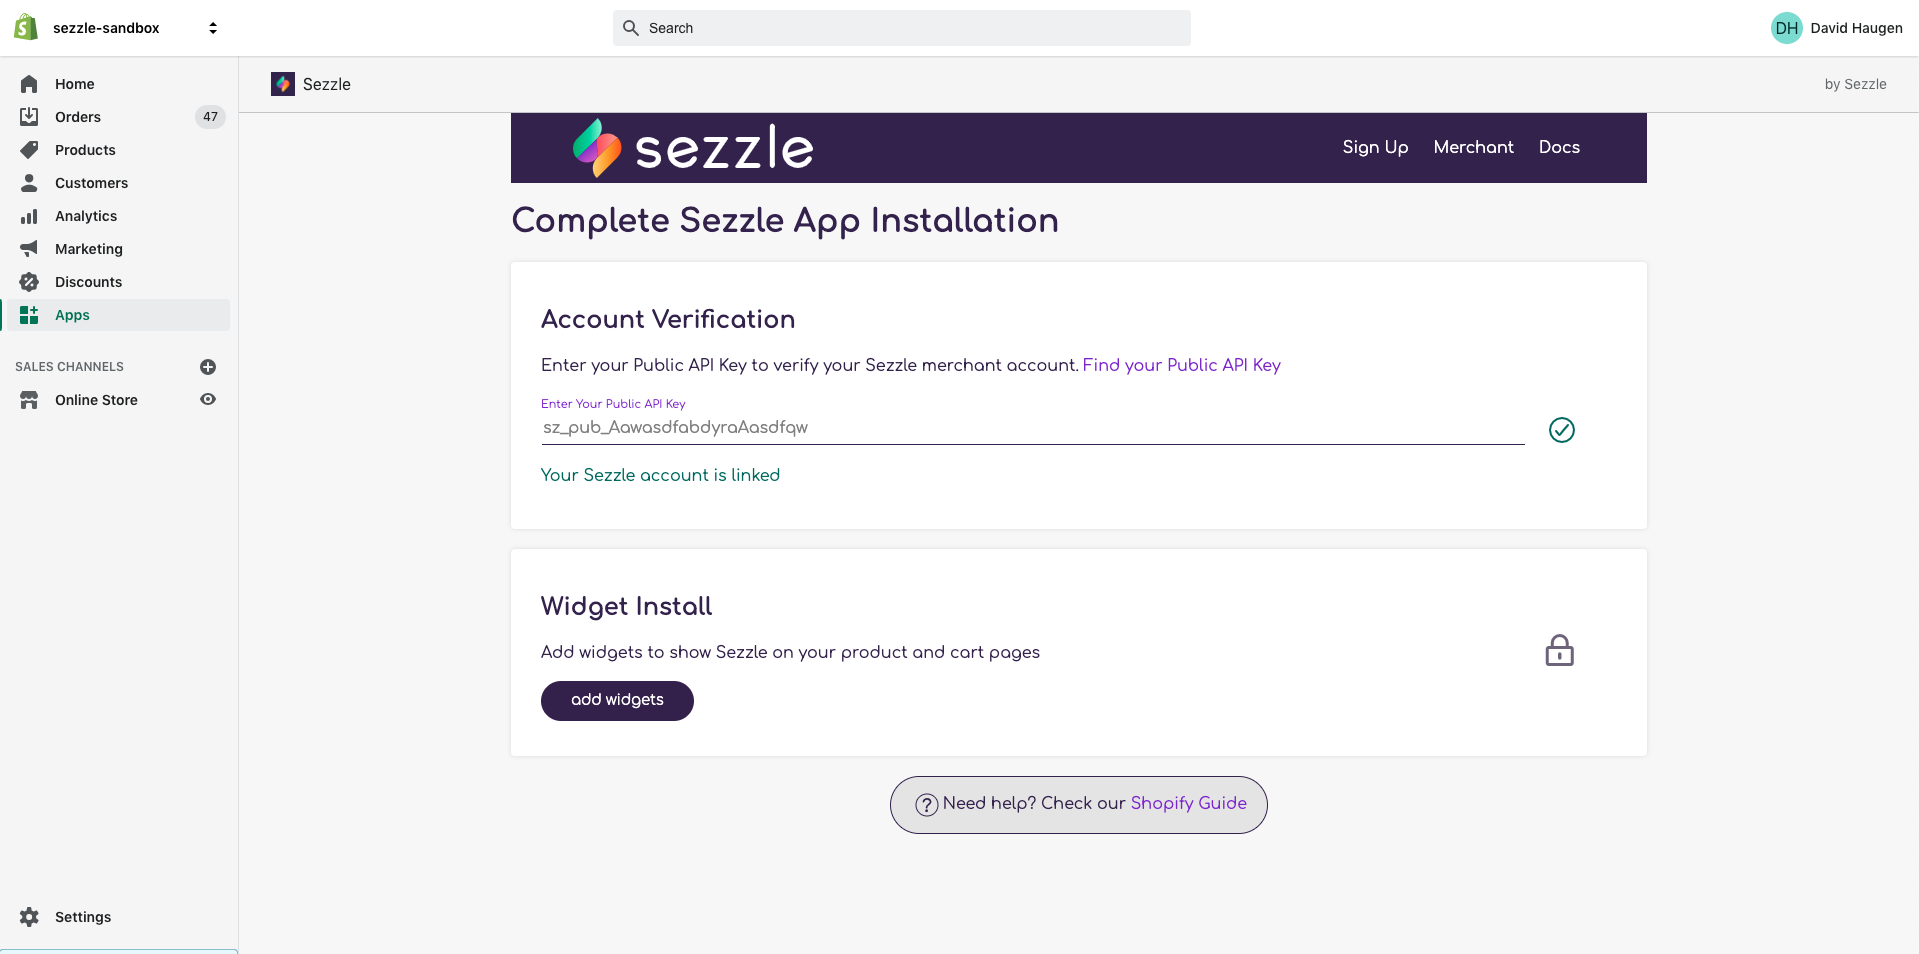
With the completion of this process, head toward one of your product pages. You may do this to check whether Sezzle widgets are added or not.
In case the widgets don’t get added, you may require the help of a professional. The process can take around 2-4 business days.

Process Of Adding Sezzle Banner To The Spotify
By using the Sezzle website, a person can easily add the Sezzle banners and different brand marks on Shopify. Upon reaching there, you get access to download various brand marks, assets, and banners in order to market Sezzle to the audience.
When the downloading process of the Sezzle banner is over, a person can install it to Shopify using the banner apps. Professional help is great for operating these banner apps. Reason? Because operating them yourself can be quite complicated.
You can find some Shopify theme that already comes with the banner feature. For that reason, you don’t particularly need to download these banner apps. How to know if the Shopify theme contains the banner feature? Nothing too complicated, just head towards your Shopify store. Upon reaching the store, navigate towards the “Themes”, and continue by clicking on the “Customize” option.
When you are in the “Header” section, search for the “Announcement Bar” or “Banner Settings.” You can check from there whether the theme allows you to add a banner or not.
You may read the theme’s documentation to know whether it supports the banner feature or not. Suppose your theme consists of the in-built banner feature. In that case, you are required to follow the theme’s documentation instructions in order to add the Sezzle banner on Shopify.
Read Also: A Complete Guide On How To Change Domain Name On WordPress
Process Of How To Put Sezzle On Shopify App
So, how to put Sezzle on Shopify? While on the Shopify app, press the Store icon and continue by clicking on the “Analytics” button. With that, head towards the section of “Alternative Payments” and locate the “Sezzle” from the given options. When you spot the “Sezzle” from the given options, continue by clicking on the “Install and Configure Sezzle Shopify App” option.
You may proceed by adding the API keys. You can find them from the Settings dashboard. After entering the API keys, you have to press the “Activate Sezzle” option. And with that, Sezzle will get added to the Shopify app without problem.
Don’t have time to go through the entire process? You may better seek expert assistance. Zone Websites is a well-known platform that can help with such procedures and more.
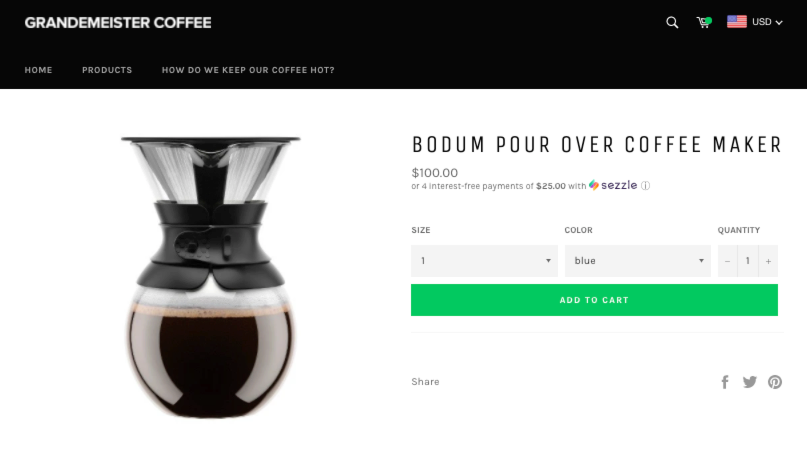
How Can You Add The Sezzle Button To Spotify?
Adding the Sezzle button on Spotify is a straightforward process. Start this process by logging into your Spotify account. From there, head towards the Sezzle homepage. You need to press the “Add Sezzle” button and continue by following the prompts in order to complete the installation process. With the installation of the Sezzle, you have access to add it to the product pages. In order to perform such a process, you need to open the theme editor and, from there, head towards the “Product template.”
You need to add the following code snippet to the location you want your Sezzle button to appear:
“<div class=”sezzle-button” data-product-id=”{{product.id}}”></div>”
And yes, with that, you can save your changes. Your customers now can see the Sezzle button on your website product pages.
How To Add Sezzle To Shopify: Conclusion
By following this guide on how to add Sezzle to Shopify, you can achieve your final goal effortlessly. But what if you don’t want to perform this process yourself?
At Zone Websites, you can find various services related to web development, website creation, logo creation, digital marketing, and much more. We will help you by increasing your market value with our top-notch services. Contact us if you require our assistance related to anything on your website.